Cloudflare has established itself as a key player on the web in recent years, offering not only CDN services, but also protection against various attacks. However, for these protections to be fully effective, it is essential that the server is correctly configured.
Indeed, it is crucial to prevent attackers from gaining direct access to the servers hosting web applications. To do this, users must use Cloudflare, which will redirect traffic to the server according to the specific rules defined by the client.
In this way, Cloudflare acts as a secure intermediary, transforming the traditional client <-> server architecture into a client <-> Cloudflare <-> server architecture.
In this article, we’ll explore several Cloudflare configurations for implementing this secure architecture and highlight some of the weaknesses associated with some of these solutions.
Comprehensive Guide to Cloudflare Configurations for Securing the Origin Server
- Example of an XSS Vulnerability Being Exploited Despite Cloudflare's Implementation
- Bypassing Cloudflare
- What are the Different Cloudflare Configurations for Securing the Origin Server?
- Limit the Exposure of Services to Counter the Risk of Attacks
Example of an XSS Vulnerability Being Exploited Despite Cloudflare’s Implementation
To illustrate our explanations, we will use a PHP application consisting of two parts:
- A POST request to ‘add_comment.php’ to publish a comment.
- A GET request to ‘display_comment.php’ to retrieve the comments.
Here is the request to post a comment:
POST /add_comment.php HTTP/1.1
Host: vaadata.example
[…TRUNCATED HEADER…]

author=hacker42&message=test1234
Response:
HTTP/1.1 200 OK
[…TRUNCATED HEADER…]

    <p>The message below has been successfully sent test12345</p>
An administrator can then view the latest comments with the following request:
GET /display_comment.php HTTP/1.1
Host: vaadata.example
[…TRUNCATED HEADER…]
Response:
HTTP/1.1 200 OK
[…TRUNCATED HEADER…]

<h1>Unread message</h1>
<table>
 <thead>
    <tr>
      <th scope="col">Author</th>
      <th scope="col">Message</th>
    </tr>
  </thead>
<tbody>
<tr><th scope='row'>hacker42</th><td>test1234</td></tr>
</tbody>

</table>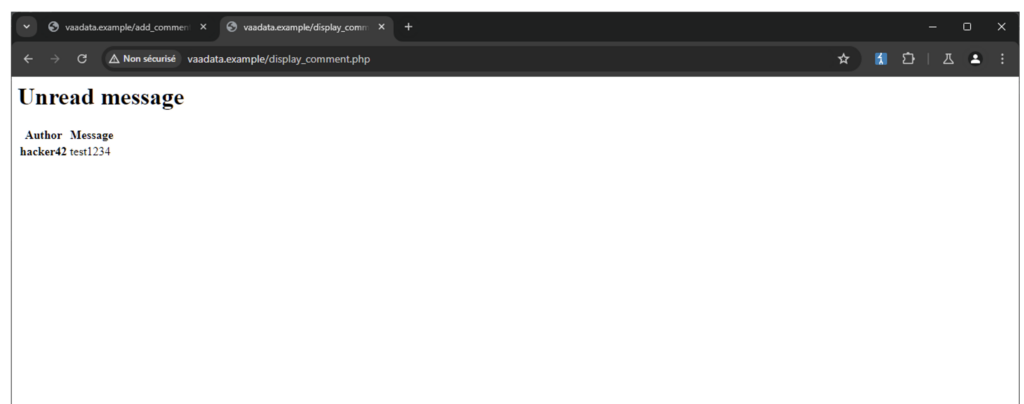
Here, although traffic from ‘vaadata.example’ passes through Cloudflare, no specific rules have been defined on Cloudflare’s Web Application Firewall (WAF).
As a result, an XSS payload submitted by an attacker will not be blocked. Furthermore, the application does not perform any data encoding, making the site entirely vulnerable to XSS attacks.
Request:
POST /add_comment.php HTTP/1.1
Host: vaadata.example
Accept-Language: fr-FR
Upgrade-Insecure-Requests: 1
User-Agent: Mozilla/5.0 (Windows NT 10.0; Win64; x64) AppleWebKit/537.36 (KHTML, like Gecko) Chrome/126.0.6478.127 Safari/537.36
Accept: text/html,application/xhtml+xml,application/xml;q=0.9,image/avif,image/webp,image/apng,*/*;q=0.8,application/signed-exchange;v=b3;q=0.7
Accept-Encoding: gzip, deflate, br
Connection: keep-alive
Content-Type: application/x-www-form-urlencoded
Content-Length: 53

author=hacker42&message=<script>alert('XSS')</script>
Response:
HTTP/1.1 200 OK
Host: vaadata.example
Date: Tue, 02 Jul 2024 15:37:22 GMT
Connection: close
X-Powered-By: PHP/8.3.8
Content-type: text/html; charset=UTF-8

    <p>The message below has been successfully sent <script>alert('XSS')</script> </p>
The administrator accessing the message will also be tricked:

Faced with this situation, the administrator will simply choose to activate Cloudflare’s WAF (because it’s much easier than tackling the source of the problem):
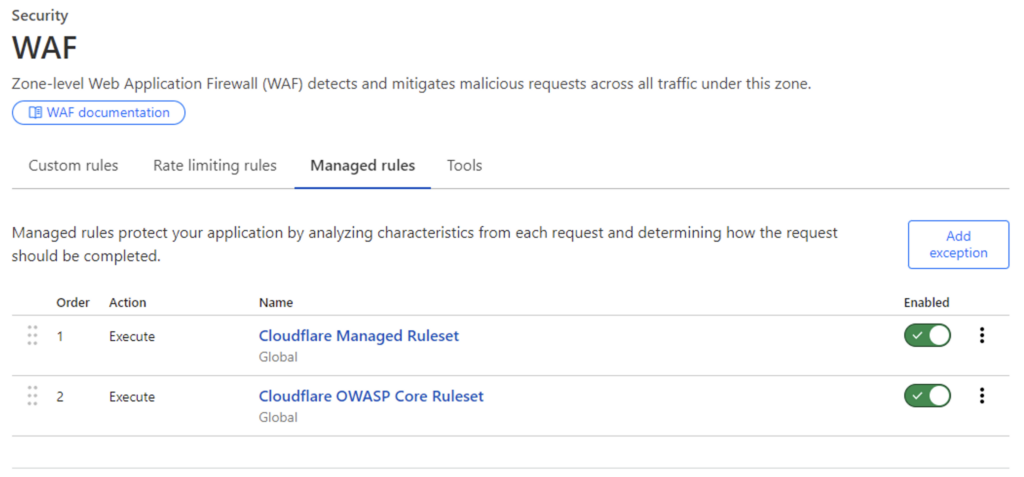
This will have the effect of blocking the attacker’s request:
POST /add_comment.php HTTP/1.1
Host: vaadata.example
[…TRUNCATED HEADER…]

author=hacker42&message=test12345<script>alert('XSS')</script>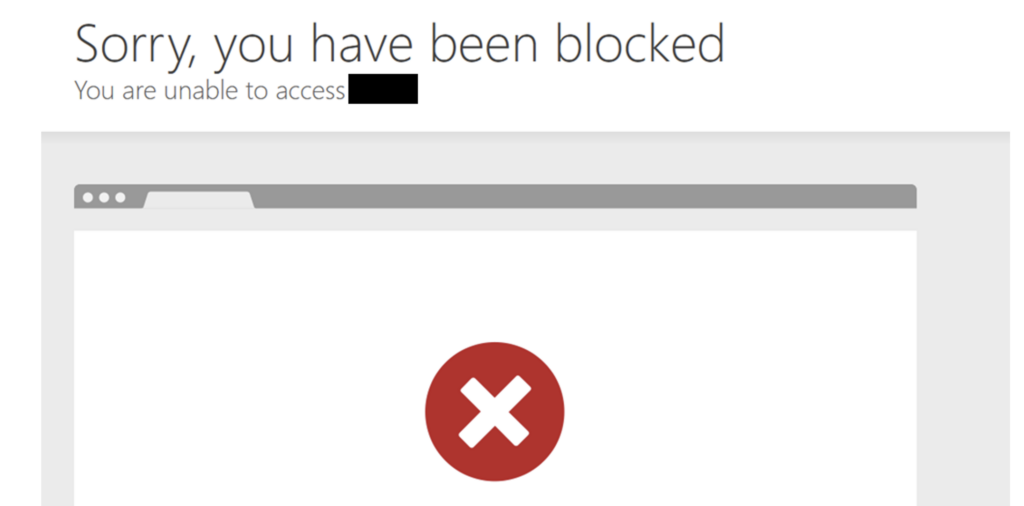
NB: Cloudflare should be seen as a layer of defence in depth and not as a single security solution. Although this article does not focus on ways of bypassing Cloudflare, it is important to note that such possibilities do exist.
For example, some circumventions can be achieved by submitting data that exceeds a certain character length, which could potentially bypass certain protections.
Request:
POST /add_comment.php HTTP/1.1
Host: vaadata.example
[…TRUNCATED HEADER…]
Content-Length: 40867

author=hacker42&message=AAAAAAAAAAAAAAAAAAAAA[…TRUNCATED DATA]AAAAAAAAAAAAAAAAAAAAA <script>console.log('XSS')</script>
Response:
HTTP/1.1 200 OK
[…TRUNCATED HEADER…]

    <p>The message below has been successfully sent […TRUNCATED DATA]
Bypassing Cloudflare
When an attacker targets a Cloudflare-protected site, one of the first steps is often to discover the IP address of the originating server. Several methods can be used to achieve this:
- Analysing the history of DNS records.
- Performing a search based on the content or favicon of the site.
- Exploiting a leak of the server’s IP address.
Here, we assume that the attacker found the server’s real address during his reconnaissance: 256.256.256.256. The IP address doesn’t belong to the authorised range, but that’s just for the example.
Now all they have to do is change the original address to carry out the attack:
Request:
curl --path-as-is -i -s -k -X $'POST' \

    -H $'Host: vaaata.example' -H $'User-Agent: Mozilla/5.0 (Windows NT 10.0; Win64; x64; rv:127.0) Gecko/20100101 Firefox/127.0' -H $'Accept: text/html,application/xhtml+xml,application/xml;q=0.9,image/avif,image/webp,*/*;q=0.8' -H $'Accept-Language: fr,fr-FR;q=0.8,en-US;q=0.5,en;q=0.3' -H $'Accept-Encoding: gzip, deflate, br' -H $'Connection: keep-alive' -H $'Upgrade-Insecure-Requests: 1' -H $'Priority: u=1' -H $'Content-Type: application/x-www-form-urlencoded' -H $'Content-Length: 68' \

    --data-binary $'author=hacker42&message=test12345<script>alert(\'XSS\')</script>' \

    $'http://256.256.256.256/add_comment.php'
Response:
HTTP/1.1 200 OK
[…TRUNCATED HEADER…]

    <p>The message below has been successfully sent test12345<script>alert('XSS')</script> </p>
Here, it is clear that if the server is not configured correctly, the protection can be easily bypassed as soon as the server’s IP address is discovered.
In the rest of this article, we will explore the measures that can be implemented to secure the origin server against these attacks.
What are the Different Cloudflare Configurations for Securing the Origin Server?
Allow Cloudflare IP addresses
An obvious approach to securing the origin server is to restrict access exclusively to IP addresses belonging to Cloudflare. This measure can be implemented directly through the server’s firewall.

This means that the attacker will not be able to target the server directly, as he will not receive any response from it and will therefore be forced to go through Cloudflare.
The advantage of this approach is that it is easy to set up. However, it is not foolproof. According to Cloudflare’s documentation, this configuration can be circumvented by techniques such as IP spoofing. Furthermore, an attacker can relatively easily carry out an attack using an IP address belonging to Cloudflare, although this requires certain specific steps to be followed.
To do this, the attacker first registers a domain on Cloudflare, then configures the DNS for that domain to redirect traffic to the IP address of the server he has discovered.

Finally, he injects his XSS payload directly into his ‘hacker.example’ sub-domain. This will send the attack via Cloudflare, which will then redirect it to the legitimate server using an IP address belonging to Cloudflare, and therefore authorised by the firewall.
Request:
POST /add_comment.php HTTP/1.1
Host: hacker.example
[…TRUNCATED HEADER…]

author=hacker42&message=<script>alert('XSS')</script>
Response:
HTTP/1.1 200 OK
[…TRUNCATED HEADER…]

    <p>The message below has been successfully sent<script>alert('XSS')</script> </p>
This makes it possible to re-inject XSS into the application.
NB: From now on, we’ll assume that ‘hacker.example’ keeps this configuration.
Note that the choice of host is limited, and that one method of blocking the request is to check the host on the origin side.
HTTP Header Validation
Another solution proposed by Cloudflare consists of adding a custom header and checking its presence on the application side.
For example, the administrator of ‘vaadata.example’ can add the following rule:
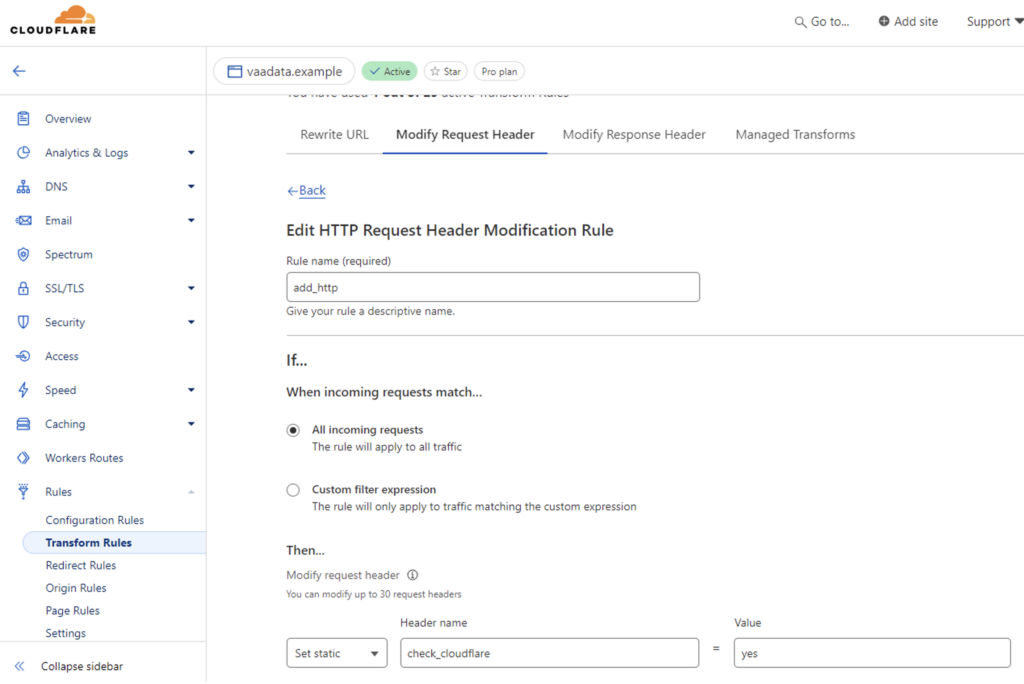
Then he will add code to his PHP application to check that the header is in place:
<?php

if (!isset($_SERVER['HTTP_CHECK_CLOUDFLARE']) || $_SERVER['HTTP_CHECK_CLOUDFLARE'] === 'yes') {
    header('HTTP/1.0 401 Unauthorized');
    die;
}
Note that the name and value of the custom header are arbitrary.
For example, accessing the ‘vaadata.example’ site now correctly returns ‘Hello World’. However, any attempt to access the application via its IP address or via another domain pointing to the server’s IP address, as illustrated in the previous section, will no longer work.
Request:
GET / HTTP/1.1
Host: hacker.example
[…TRUNCATED HEADER…]
Response:
HTTP/1.1 401 Unauthorized
[…TRUNCATED HEADER…]
However, this method has several disadvantages:
- It can be complex to set up on the application side, as each page must be checked for the presence of the header. However, this task can be simplified if the check can be centralised on the web server. Similarly, the use of middleware in the application can automate this header check for all requests.
- If the custom header leaks, an attacker can discover it and add it to his requests. For example, in this case, the attacker found the ‘phpinfo4256.php’ page, which leaks the ‘HTTP_CHECK_CLOUDFLARE’ header.

All he has to do is add this header to his requests:
GET / HTTP/1.1
Host: hacker.example
CHECK_CLOUDFLARE: yes
[…TRUNCATED HEADER…]
Response:
HTTP/1.1 200 OK
[…TRUNCATED HEADER…]

<!doctype html>
<html lang="fr">
<head>
    <meta charset="utf-8">
    <title>Titre de la page</title>
</head>
<body>
<p>Hello world</p>
</body>
</html>
It is therefore crucial to encrypt traffic using SSL (HTTPS), because if requests are not secure, they can be intercepted by an attacker.
Authenticated Origin Pulls
How does mTLS (mutual TLS) authentication work?
To understand this security, it is essential to become familiar with the concept of mTLS (mutual TLS authentication). Before doing so, it is useful to have a quick understanding of TLS.
TLS (Transport Layer Security) is a standard protocol commonly used to encrypt communications on the Internet, ensuring the confidentiality and integrity of data transmitted between the client (such as a web browser) and the server.
The Cloudflare site has an illustration that clearly explains how it works:
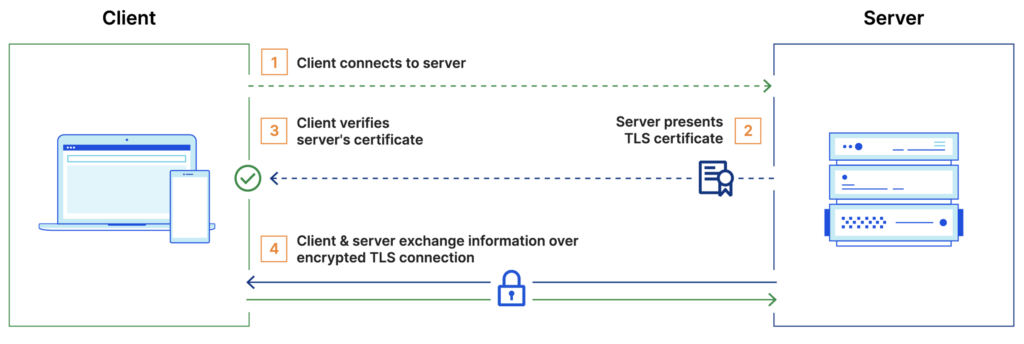
The steps are as follows:
- First, the client connects to the server.
- Then, the server presents its certificate.
- Finally, the client verifies the certificate.
- The client and server then exchange information over an encrypted connection.
As we can see, it is only the server that presents its certificate.
With mTLS, the principle remains similar, but this time both parties (client and server) each have a certificate and use it to authenticate each other.
In this way, the server proves its identity to the client and vice versa. The aim is to guarantee secure, two-way authentication.
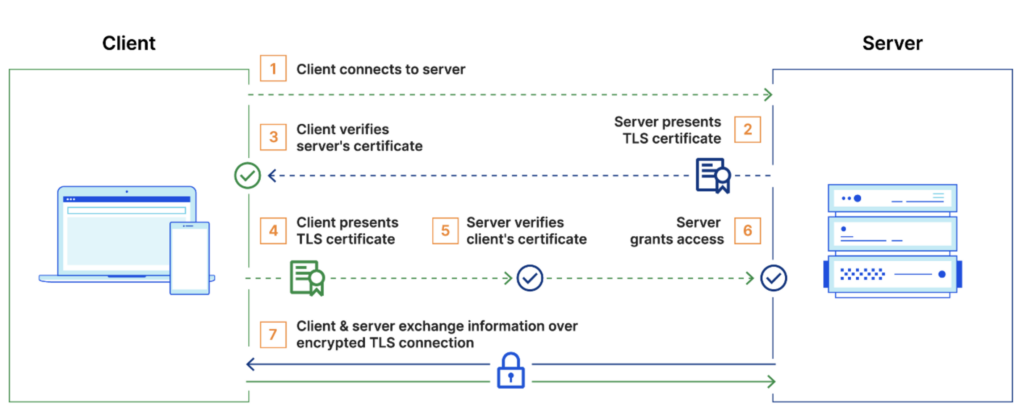
So, after step 3 (negotiating the session key), three further steps are required before communication can actually begin:
- The client presents its certificate.
- Next, the server verifies the client’s certificate.
- Finally, the server grants access.
- The client and server then exchange information via an encrypted connection.
Configuring mTLS in Cloudflare
With Cloudflare, a certificate is used to prove identity to the origin server. This server must also have a certificate, such as those issued by Let’s Encrypt or Cloudflare.
A legitimate exchange works as follows:
- When a client accesses the ‘vaadata.example’ site, the request is intercepted and verified by Cloudflare.
- Cloudflare then sends the request to the origin server while authenticating with its certificate. In this way, the server can be sure that the request really came from Cloudflare. If the certificate is recognised as valid, the server accepts the communication.
In the case of an attacker trying to access the site directly via the server’s IP address, the access will fail because he does not provide a valid certificate to authenticate himself. Similarly, if the attacker tries to access the ‘hacker.example’ site without having correctly configured the SSL parameters to use a valid Cloudflare certificate, the connection will also be rejected by the server.
However, the attacker can reproduce the configuration of the ‘vaadata.example’ site because no data is indevinable. To do this, he just needs to follow the steps below:
First configure SSL/TLS to full.
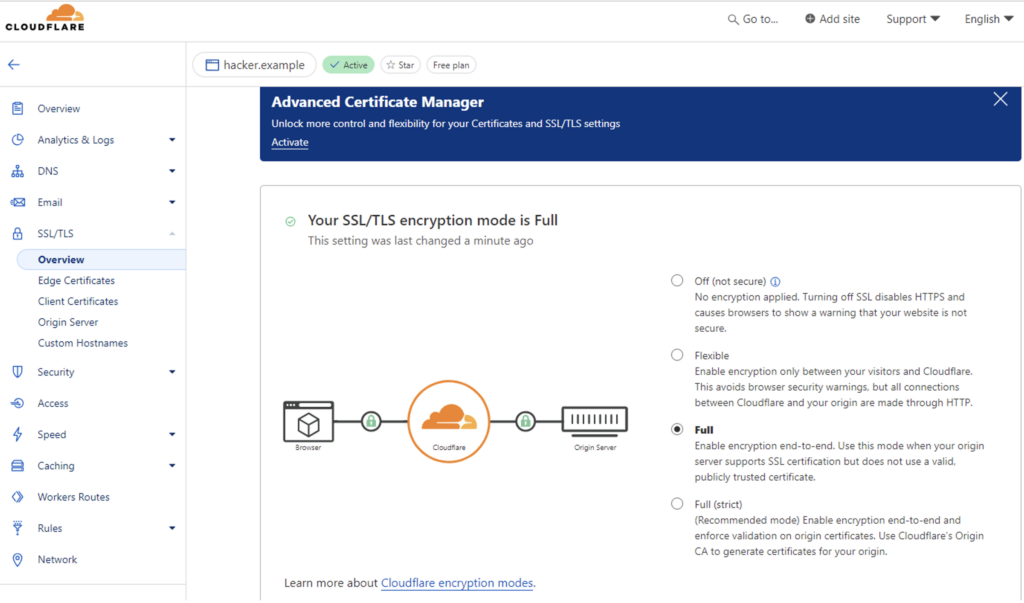
Then activate the Authenticated Origin Pulls option on his Cloudflare domain. Here’s how it works:
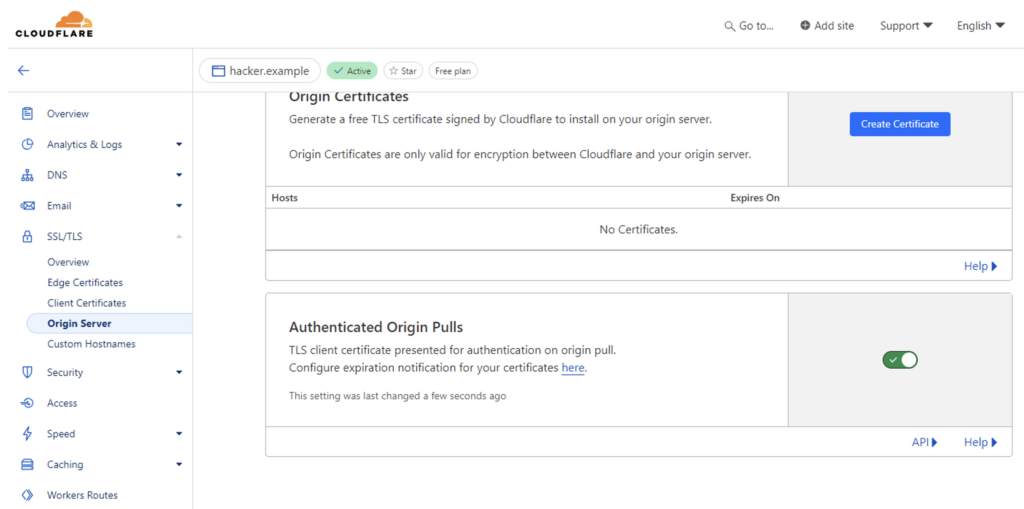
After these two steps, the request works again:
GET / HTTP/1.1
Host: hacker.example
[…TRUNCATED HEADER…]
Response:
HTTP/1.1 200 OK
Host: hacker.example
[…TRUNCATED HEADER…]

<!doctype html>
<html lang="fr">
<head>
    <meta charset="utf-8">
    <title>Titre de la page</title>
</head>
<body>
<p>Hello world</p>
</body>
</html>
In our case, this works because by default Cloudflare uses the same certificate to authenticate with the sites. So for ‘vaadata.example’ or ‘hacker.example’ the certificate supplied to the origin server will be signed by the same certificate authority.
This means that as long as the origin server accepts Cloudflare certificates by default, the attacker can pass himself off as a legitimate Cloudflare user just by editing his account.
To protect yourself against this type of attack, it’s a good idea to use a custom certificate, generated specifically for your domain, rather than using Cloudflare’s default certificate.
Creating a Cloudflare tunnel
One recommended solution is to create a Cloudflare tunnel. This approach offers a number of advantages, not least that it strengthens the security of the origin server.
With a Cloudflare tunnel, all connections are outbound only, so all incoming traffic to the origin server is blocked. This significantly reduces the server’s exposure to potential attacks, as requests can only reach the server via the secure tunnel established by Cloudflare.
So even if an attacker knows the IP address of the server, they will never be able to access it if the server is correctly configured to work only with a Cloudflare tunnel.
Similarly, any attempt by the attacker to configure a domain on Cloudflare to imitate ‘vaadata.example’ will be in vain, as he will never be able to reproduce exactly the same configuration, i.e. associate the domain with the same tunnel.
Furthermore, even if the attacker manages to set up a similar configuration, Cloudflare performs additional rights checks to ensure that only requests from the legitimate domain pass through the secure tunnel.
In this way, using a Cloudflare tunnel offers robust protection against bypass attempts and direct attacks on the origin server.
The use of a Cloudflare tunnel can also be extended to other services, to ensure that all traffic passes through a secure, controlled channel.
A Cloudflare tunnel works as follows:
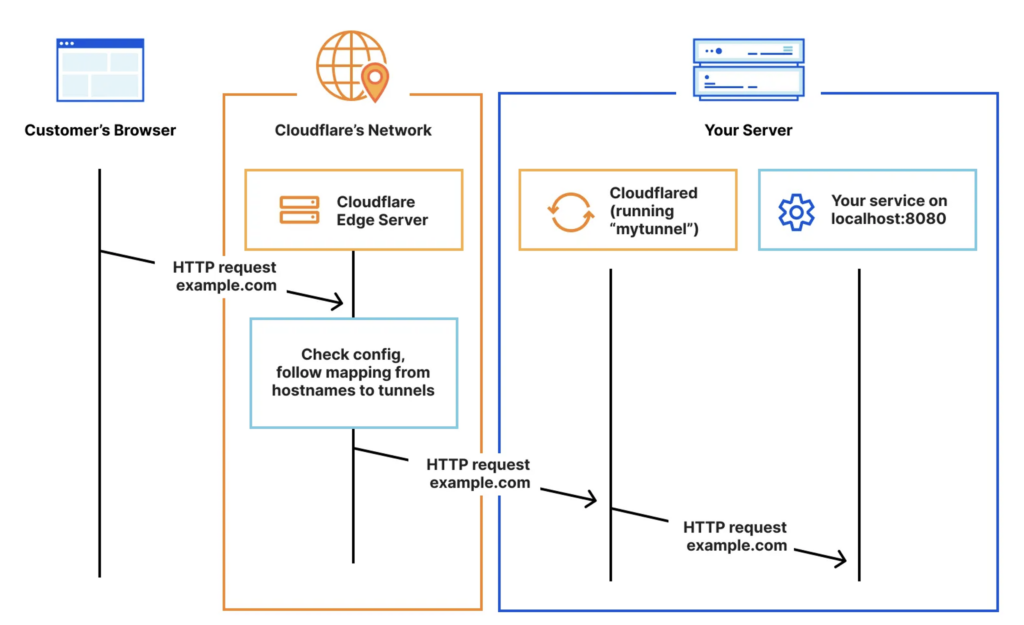
In our opinion, this configuration is the best solution for securing your origin server. It ensures that all traffic passes through a secure channel and limits the server’s exposure to potential attacks.
Limit the Exposure of Services to Counter the Risk of Attacks
An important point to remember when configuring Cloudflare is which ports it proxies. By default, Cloudflare proxies several ports in addition to the standard ports 80 (HTTP) and 443 (HTTPS).
So if your server exposes other services on unsecured ports, such as 8080, and the configuration is not properly restricted, these services may be unintentionally exposed via Cloudflare.
To configure this protection at the level of your Cloudflare WAF, you can activate specific rules to block or monitor requests to non-standard ports.
- If you are using WAF Managed Rules (old version), enable rule
100015(Anomaly:Port – Non Standard Port (not 80 or 443)) to block connections to ports other than 80 and 443. - If you are using the newer version (Cloudflare Web Application Firewall (WAF)), enable the rule
8e361ee4328f4a3caf6caf3e664ed6fe(Anomaly:Port – Non Standard Port (not 80 or 443)) to detect and prevent access to non-standard ports.
By applying these rules, you ensure that only connections on authorised ports (80 and 443) are accepted, reducing the risk of exposing unsecured or unexpected services via Cloudflare.
Conclusion
We’ve explored different Cloudflare configurations for securing the origin server. However, most of these configurations have drawbacks that can allow an attacker to bypass the protections.
The approach of attackers is often the same: try to reproduce the Cloudflare configuration in order to use it as an attack vector.
Although we haven’t gone into detail about Cloudflare bypass methods, it’s important to bear in mind that they do exist. Cloudflare complicates the task of attackers, but it is not foolproof. It should therefore be seen as a layer of defence in depth, not as the only layer of protection.
SOURCES :
Images
https://www.cloudflare.com/resources/images/slt3lc6tev37/37w1tzGsD4XvYUkQCHbWG8/6fbbb48d0f5077cc2c662a4cc6817b1c/how_tls_works-what_is_mutual_tls.png
https://www.cloudflare.com/resources/images/slt3lc6tev37/5SjaQfZzDLEGqyzFkA0AA4/d227a26bbd7bc6d24363e9b9aaabef55/how_mtls_works-what_is_mutual_tls.png
https://developers.cloudflare.com/_astro/handshake.eh3a-Ml1_ZvgY0m.webp
Key Resources
https://developers.cloudflare.com/fundamentals/basic-tasks/protect-your-origin-server
https://developers.cloudflare.com/fundamentals/reference/network-ports
https://developers.cloudflare.com/cloudflare-one/connections/connect-networks/get-started/create-remote-tunnel
https://developers.cloudflare.com/cloudflare-one/connections/connect-networks
https://www.cloudflare.com/fr-fr/learning/access-management/what-is-mutual-tls
Author: Thomas DELFINO – Pentester @Vaadata
