To improve the display speed of web pages and lighten server loads, many companies rely on caching mechanisms.
This system enables frequently requested resources (such as images, scripts or HTML pages) to be stored temporarily, so that they can be served up more quickly on subsequent requests.
As well as contributing to a better user experience, caching also plays a key role in SEO, since optimised loading times can have a positive impact on search engine rankings.
However, to fully exploit the benefits of caching without compromising security, it is essential to understand how it works and the different types that exist. This understanding is all the more important because poorly exploited flaws in cache management can pave the way for fearsome attacks, such as web cache poisoning.
Comprehensive Guide to Web Cache Poisoning
What is Caching and How it Works
As mentioned above, the cache system plays a key role in optimising web performance. It allows certain resources to be stored temporarily in order to limit redundant calls to the server and speed up page display.
There are two main types of cache: private and shared.
- The private cache is specific to a user. It is generally stored in the browser and contains elements specific to the user’s session or profile. This type of cache should never be shared, as it may contain sensitive information.
- The shared cache, on the other hand, is used to store content common to several users, such as static HTML files, JavaScript scripts, CSS style sheets or images. This cache can be managed at different levels of the infrastructure, in particular via proxies, reverse proxies or content distribution networks (CDNs). The aim is to reduce the load on the origin servers and accelerate the delivery of resources on a large scale.
It is precisely this shared cache that is the main target of a web cache poisoning attack. If an attacker manages to inject a malicious response into the cache, it can be served to many users, amplifying the impact of the attack.
There are other types of cache in the web ecosystem: the OPcache (for executing PHP scripts) and the database cache. These will not be discussed here, as they are not directly affected by web cache poisoning.
Finally, it is important to remember that the cache is mainly used for static content, i.e. resources that are identical for all users. However, certain techniques can be used to cache dynamic content.
Understanding the role of HTTP headers in cache management
HTTP headers play an essential role in cache management. They enable the various parties involved in processing a request (browser, server, proxy, CDN, etc.) to know how to store, validate or reject a response. Among them, the most decisive in terms of caching is the Cache-Control header.
Cache-Control and Age headers
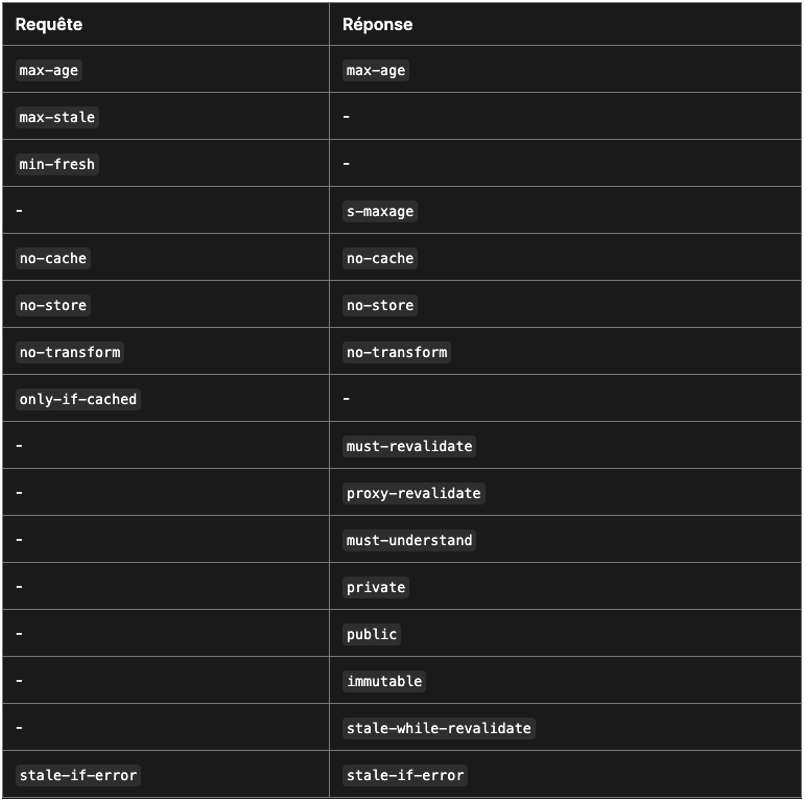
According to RFC 9111, Cache-Control is used to specify directives that apply to all caches present on the path of a request or response.
This header can appear in the HTTP response, to indicate how the response should be cached, but also in the HTTP request, to indicate how the client wants the response to be handled by the intermediate caches.
Another useful header is Age, which indicates how long a response has been cached. It is expressed in seconds and can be used to determine whether a resource is still ‘fresh’ or whether it is about to expire.
Understanding and manipulating these headers is essential for anyone wishing to secure cache management or for an attacker wishing to exploit it via a web cache poisoning attack.
Let’s take a concrete example:
Cache-Control: max-age=604800
Age: 100
In this case:
max-age=604800means that the response can be considered ‘fresh’ for 604,800 seconds (i.e. 7 days).Age: 100indicates that the response has already been cached for 100 seconds.
This means that the content is still valid and will be served as is as long as the max-age has not been exceeded. This type of information is crucial for understanding the behaviour of caches and the potential opportunities for hijacking them.
Other directives that can be added to Cache-Control
Other directives can be added to the Cache-Control to specify its behaviour, such as:
publicorprivate: to indicate whether the resource can be shared between several users.no-store: to prohibit caching.no-cache: to require validation by the server before use.must-revalidate,proxy-revalidate,s-maxage, etc.
Understanding the cache key
The operation of the cache is based on a central element: the cache key. This is a unique identifier generated from the elements of an HTTP request. This key is constructed by combining various parameters such as:
- the URL requested,
- certain HTTP headers (such as
Accept-Encoding,Host,User-Agent…), - or even request parameters, cookies or session elements.
How it works on the server side
When a server or proxy receives a request, it generates a cache key corresponding to this request, then checks whether a corresponding response is already present in the cache. If it is, the cached response is immediately sent back to the client, thus avoiding unnecessary demands on the origin server. This is known as a cache hit.
In the opposite case (cache miss), the resource is retrieved from the origin server. If this resource is deemed eligible for caching (according to the Cache-Control, Vary directives, or other configuration rules), it is then stored with the generated key, ready to be served to future similar requests.
Decoding a cache configuration
Let’s take an example of cache configuration with Nginx:
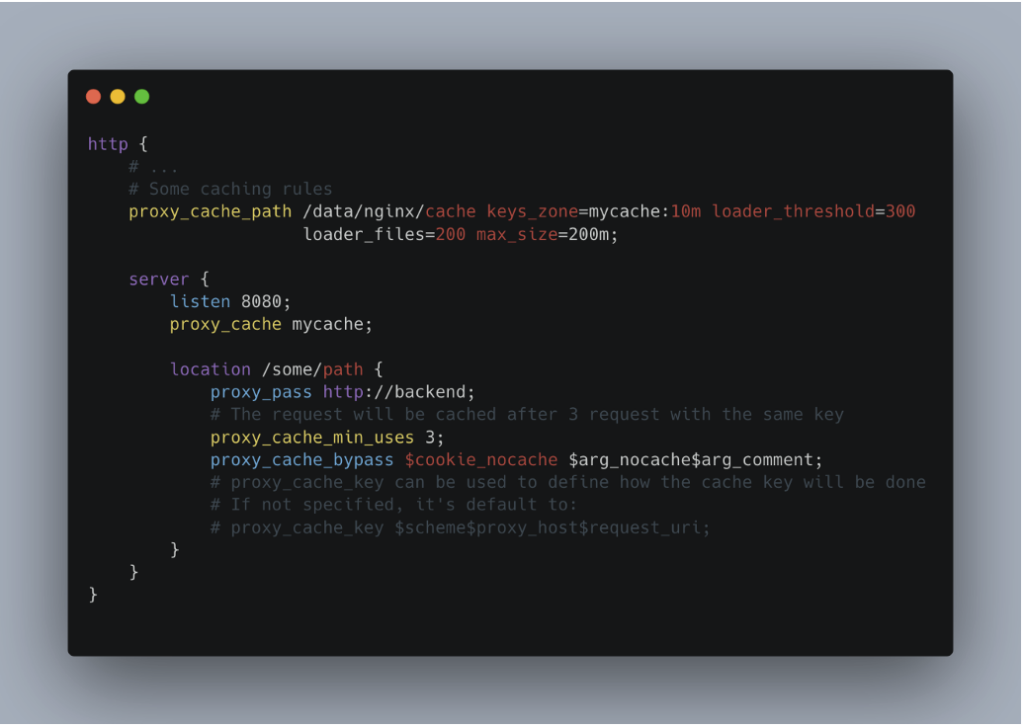
Let’s break down this configuration:
proxy_cache_path: Defines the location of the cache on disk, global parameters such as the maximum size of stored files, and the memory area (e.g.mycache) used to manage cache keys.proxy_cache: Enables caching by specifying the memory zone to be used (mycache, here).location /some/path: Specifies that the configuration applies to requests targeting the/some/pathpath.proxy_pass: Specifies the URL of the upstream server to which requests should be sent (here:http://backend).proxy_cache_min_uses: Defines the minimum number of requests with the same key before the response is cached. This prevents rarely requested content from being stored.proxy_cache_bypass: Allows you to define conditions for ignoring caching. For example, if anocache=truecookie is present, the request will bypass the cache.proxy_cache_key: Specifies how the cache key is generated. By default, it is based on$scheme$proxy_host$request_uri, but it can be customised to include other elements (such as headers).
In this configuration, responses from the backend server on the /some/path path will only be cached after they have been requested at least 3 times with the same key (proxy_cache_min_uses 3).
If a request contains a cookie such as nocache=true, it will bypass the cache even if it meets the other conditions. Once the response has been cached, all subsequent requests sharing the same key will be served directly from the cache, without calling the backend again.
Web Cache Poisoning and Web Cache Deception
There are two main types of attack related to HTTP caching: Web Cache Poisoning and Web Cache Deception. Although they are both based on similar mechanisms, namely the exploitation of a poorly configured caching system, their objectives differ:
- Web Cache Deception: This attack aims to trick the caching system into storing responses containing sensitive or personal information belonging to an authenticated user. Once cached, this data can then be served to other unauthenticated users accessing the same link. This can lead to unintentional exposure of private data. This type of attack will be the subject of a dedicated article.
- Web Cache Poisoning: Here, the objective is different. The attacker seeks to inject malicious content into the cache, so that it is served to legitimate users on their next requests. The attack may be aimed at injecting malicious JavaScript, redirecting the user to a phishing site, or falsifying expected responses.
In the remainder of this article, we will focus on Web Cache Poisoning, exploring its mechanisms, attack vectors and concrete examples to help you understand its impact.
What is Web Cache Poisoning?
How Web Cache Poisoning works
For a Web Cache Poisoning attack to be possible, several preconditions must be met.
The principle is based on subtle manipulation of the cache system by exploiting discrepancies between the elements that influence the server response and those that make up the cache key.
First of all, and this may seem obvious, the targeted resource must be cached and, above all, it must be public (i.e. shared between several users).
To check this, you can analyse the HTTP response headers, particularly Cache-Control, which often give clues as to the caching policies applied. However, it is important to note that a response can be served from the cache without any header explicitly indicating this.
The second crucial point is to identify an influential element not included in the cache key. We need to find a request parameter (often an HTTP header, such as X-Forwarded-Host or User-Agent) that modifies the server’s response, without this being taken into account in the generation of the cache key.
This means that if an attacker succeeds in having a modified response stored (for example, containing a malicious script), this version will be served to all users whose request corresponds to the same cache key, even if they did not transmit the malicious header.
The third step is to analyse how the injected element affects the response. Is it reflected in the body of the response? Is it displayed as is, or does it go through a validation process? Does it cause an error, a redirect or abnormal behaviour?
Depending on the last step, this will lead us to different types of vulnerability.
Impacts of Web Cache Poisoning attacks
A successful Web Cache Poisoning attack can have severe repercussions for users and the target organisation.
During our web application penetration tests, we generally encounter two types of scenario:
Stored XSS in the cache
In this case, the attacker manages to inject an XSS payload which is reflected in the response without being properly filtered or escaped.
Since this response is then cached, each user accessing this resource via the cache is served the malicious content.
This type of attack can be used to hijack sessions, steal accounts, exfiltrate sensitive data, etc.
Cache-Poisoned DoS
Cache Poisoned Denial of Service (DoS) occurs when an element not included in the cache key causes a server-side error.
This error is then memorised by the cache, and all subsequent requests will receive the same erroneous response, as long as the cache remains valid.
This can lead to partial or total unavailability of the service for users, financial losses, brand image damage, etc.
There are various ways of inducing this type of error: injection of malformed headers, overloading of an expected parameter, alteration of routing behaviour, and so on. Several of these techniques are well documented and can be reproduced for testing purposes.
Example of a Stored XSS via Cache Poisoning
To illustrate a cache poisoning attack leading to a stored XSS, let’s take the case of a web application that uses the value of the X-Forwarded-Host header to determine the location of its static JavaScript files.
This configuration becomes problematic when the application has no control over this header, allowing a malicious user to modify its value.
The vulnerable behaviour stems from the fact that the application relies on data from the user’s HTTP request, without verification or filtering, to construct a response which is then cached.
Before attempting any exploitation, it is advisable to check whether the application uses a caching mechanism.
This can be determined by observing the HTTP headers of the response:
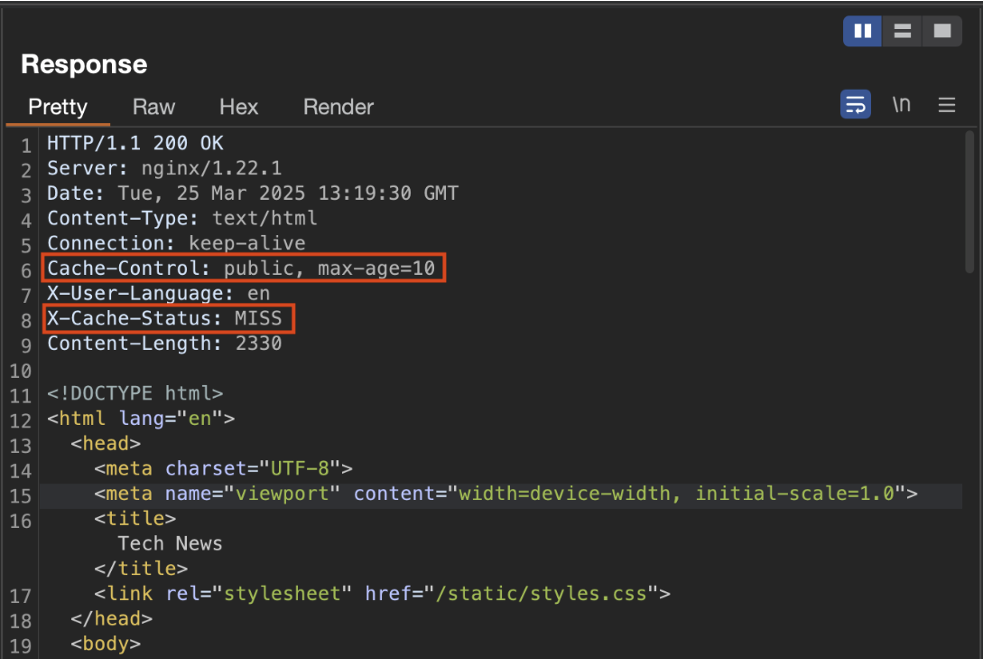
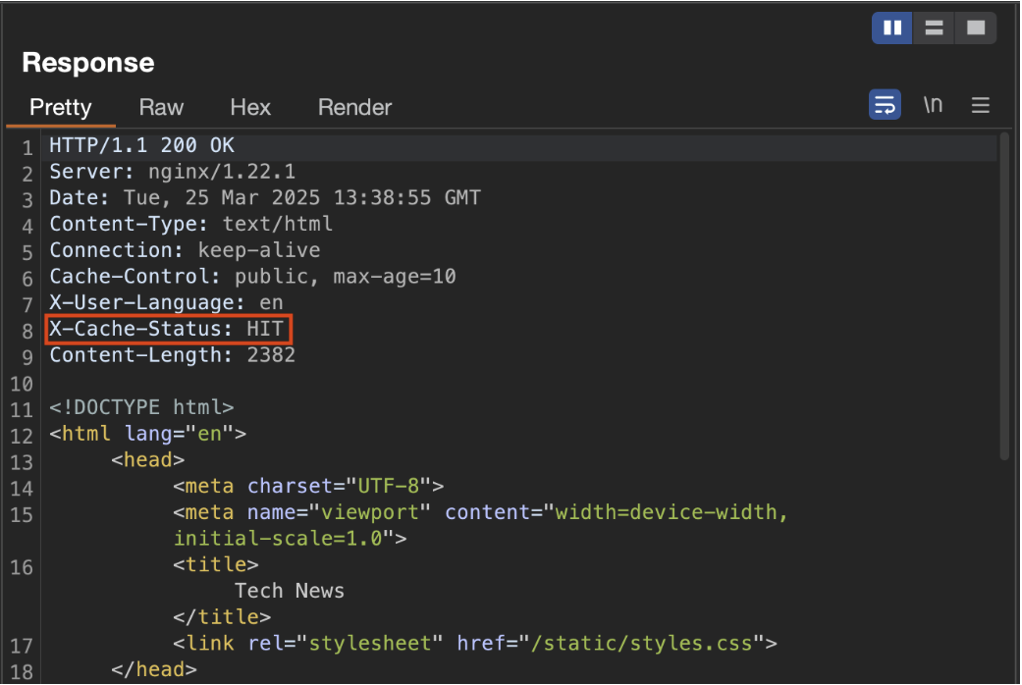
Analysing response headers
Analysis of HTTP headers provides several key pieces of information about cache behaviour:
Cache-Controlhere contains two directives:publicandmax-age=10.- The
publicdirective means that the response can be shared between several users via an intermediate cache. max-age=10indicates that the cached content will only be valid for 10 seconds. After this time, a new request must be sent to the origin server to obtain a fresh response.- This header is always present, as it determines the resource’s caching policy.
- The
X-Cache-Statusis a header used mainly for debugging.- When it displays
MISS, this means that the response was generated directly by the backend server. - If it displays
HIT, this indicates that the response was served from the cache. - This header is not always present, as it is optional and depends on the configuration of the cache system.
- When it displays
- Finally, the presence of NGINX in the headers makes it possible to deduce which server is processing the requests. Here, NGINX is responsible for cache management. By default, it uses a cache key constructed from the variable
$scheme$proxy_host$request_uri, i.e. the protocol, the proxy host and the request URI.
After an initial request, if the same request is repeated, the X-Cache-Status header now displays HIT, indicating that the response has been stored and served from the cache.
However, caching is not systematic from the second request onwards. This depends on the precise configuration of the server and the cache policies applied.
Injection via the X-Forwarded-Host header and cache hijacking
By manually adding the X-Forwarded-Host header to a request, with a value pointing to a server we control, and ensuring that the response actually comes from the server (i.e. with an X-Cache-Status at MISS), we can see that the content of the response is modified, and the /static/script.js file is now loaded from our own address:

We can see that our server does receive a request for this file. The crucial point here is that X-Forwarded-Host is not part of the cache key. This means that even though this header is used to dynamically construct the script URL, it is not taken into account when determining the uniqueness of the cached response.
As a result, the response containing the link to our external script is eligible for caching and can be served to all users whose requests match that same key (i.e. regardless of the injected header).
Since we now control the source of the script, it becomes trivial to insert malicious code. The user’s browser will load a script containing an XSS payload. We are therefore dealing with a stored XSS attack, with persistence limited to the duration defined by max-age.
An attacker could easily automate this process to inject a malicious script into the cache at regular intervals, ensuring that anyone accessing the resource receives a compromised version.
How to Prevent Web Cache Poisoning Attacks?
We have seen how caching works, how a cache poisoning attack can be exploited and the possible consequences. It is now essential to look at the best practices to put in place to protect against this type of attack.
Protecting a system against cache poisoning can be complex, as the interactions with the cache are not always easy to analyse. However, there are a number of approaches that can considerably reduce the risks:
Disable cache
This is the most radical solution, but also the most effective. By completely disabling caching, the attack surface is effectively eliminated.
However, this can lead to a degradation in performance, and should therefore be considered on the basis of the real needs of the application.
Configure cache rules correctly
A more refined alternative is to have precise control over the caching rules. It is crucial to determine which resources can be cached and which should not.
Under no circumstances should dynamic or personalised content be shared via the cache. Conversely, static or public content may be eligible.
Include certain HTTP headers in the cache key
Certain HTTP headers, such as X-Forwarded-Host, Accept-Encoding or User-Agent, can influence the server response.
If these headers are not taken into account when generating the cache key, it becomes possible for an attacker to manipulate the response without the cache taking this into account. It is therefore essential to include them explicitly in the cache key if their value influences the response.
Limit cache to static files
As far as possible, caching should be reserved for static files: images, JavaScript files, CSS style sheets, fonts, etc. These resources do not change according to the user, which considerably reduces the risk of manipulation.
Rigorously validate user input
Finally, strict validation of user input is essential. Even if a cache vulnerability is identified, correct validation often makes it possible to block the injection of malicious content, as in the case of an XSS attempt.
This involves checking the type, length, format and presence of special characters in the input fields.
Author: Théo ARCHIMBAUD – Pentester @Vaadata