
Mobile applications play a central role in today’s world. Whether for personal or professional use, they are everywhere and often indispensable in our daily lives.
However, this ubiquity also exposes users and businesses to increased security risks. Identifying vulnerabilities before they are exploited has become a priority, and open source tools such as Frida enable pentesters to test the robustness of mobile applications against attacks.
The aim of this article is to give a general overview of Frida, its main uses and a few concrete examples that a pentester might encounter during a mobile penetration test.
Given the depth and power of Frida, we can only cover part of its features in this article. However, we hope that this introduction will encourage you to explore Frida and its many use cases.
Frida is a toolkit that enables dynamic interaction with running programs.
Its use is not limited to mobile applications. In addition to Android and iOS apps, Frida can be used with native software on Windows, macOS or Linux.
The principle behind Frida is that it allows you to interact with a targeted running process by injecting arbitrary JavaScript scripts into it. This allows the software’s behaviour to be dynamically modified.
In concrete terms, these scripts can ‘hook’ into the methods of classes present in the code and alter various elements, such as the returned value or the input arguments. In this way, the internal logic of the program can be modified without touching the binary. This technique is called method hooking.
Frida has a wide range of uses. A developer can use it to better understand a piece of software and debug it quickly and easily. During a mobile application penetration test, Frida is mainly used to bypass security mechanisms that could hinder the audit; or to exploit vulnerabilities, without having to modify the application code.
As far as script development is concerned, one of Frida’s key features is its API, in addition to various tools that facilitate interaction with the targeted processes. We’ll look at some examples of scripts later in this article. Note that Frida can also be used with different languages, such as Python or NodeJS, in addition to JavaScript code.
In a mobile context, Frida is installed both on the user’s machine and on the phone where the application to be tested is installed. We won’t go into detail about installing Frida here, as its documentation is already very comprehensive.
However, we will look at the two main types of installation, which are of interest depending on the situations encountered during a mobile pentest.
Note that in both cases, Frida is installed in the same way on the pentester’s machine. The difference lies in the way Frida is installed on the phone where the mobile application to be tested is installed.
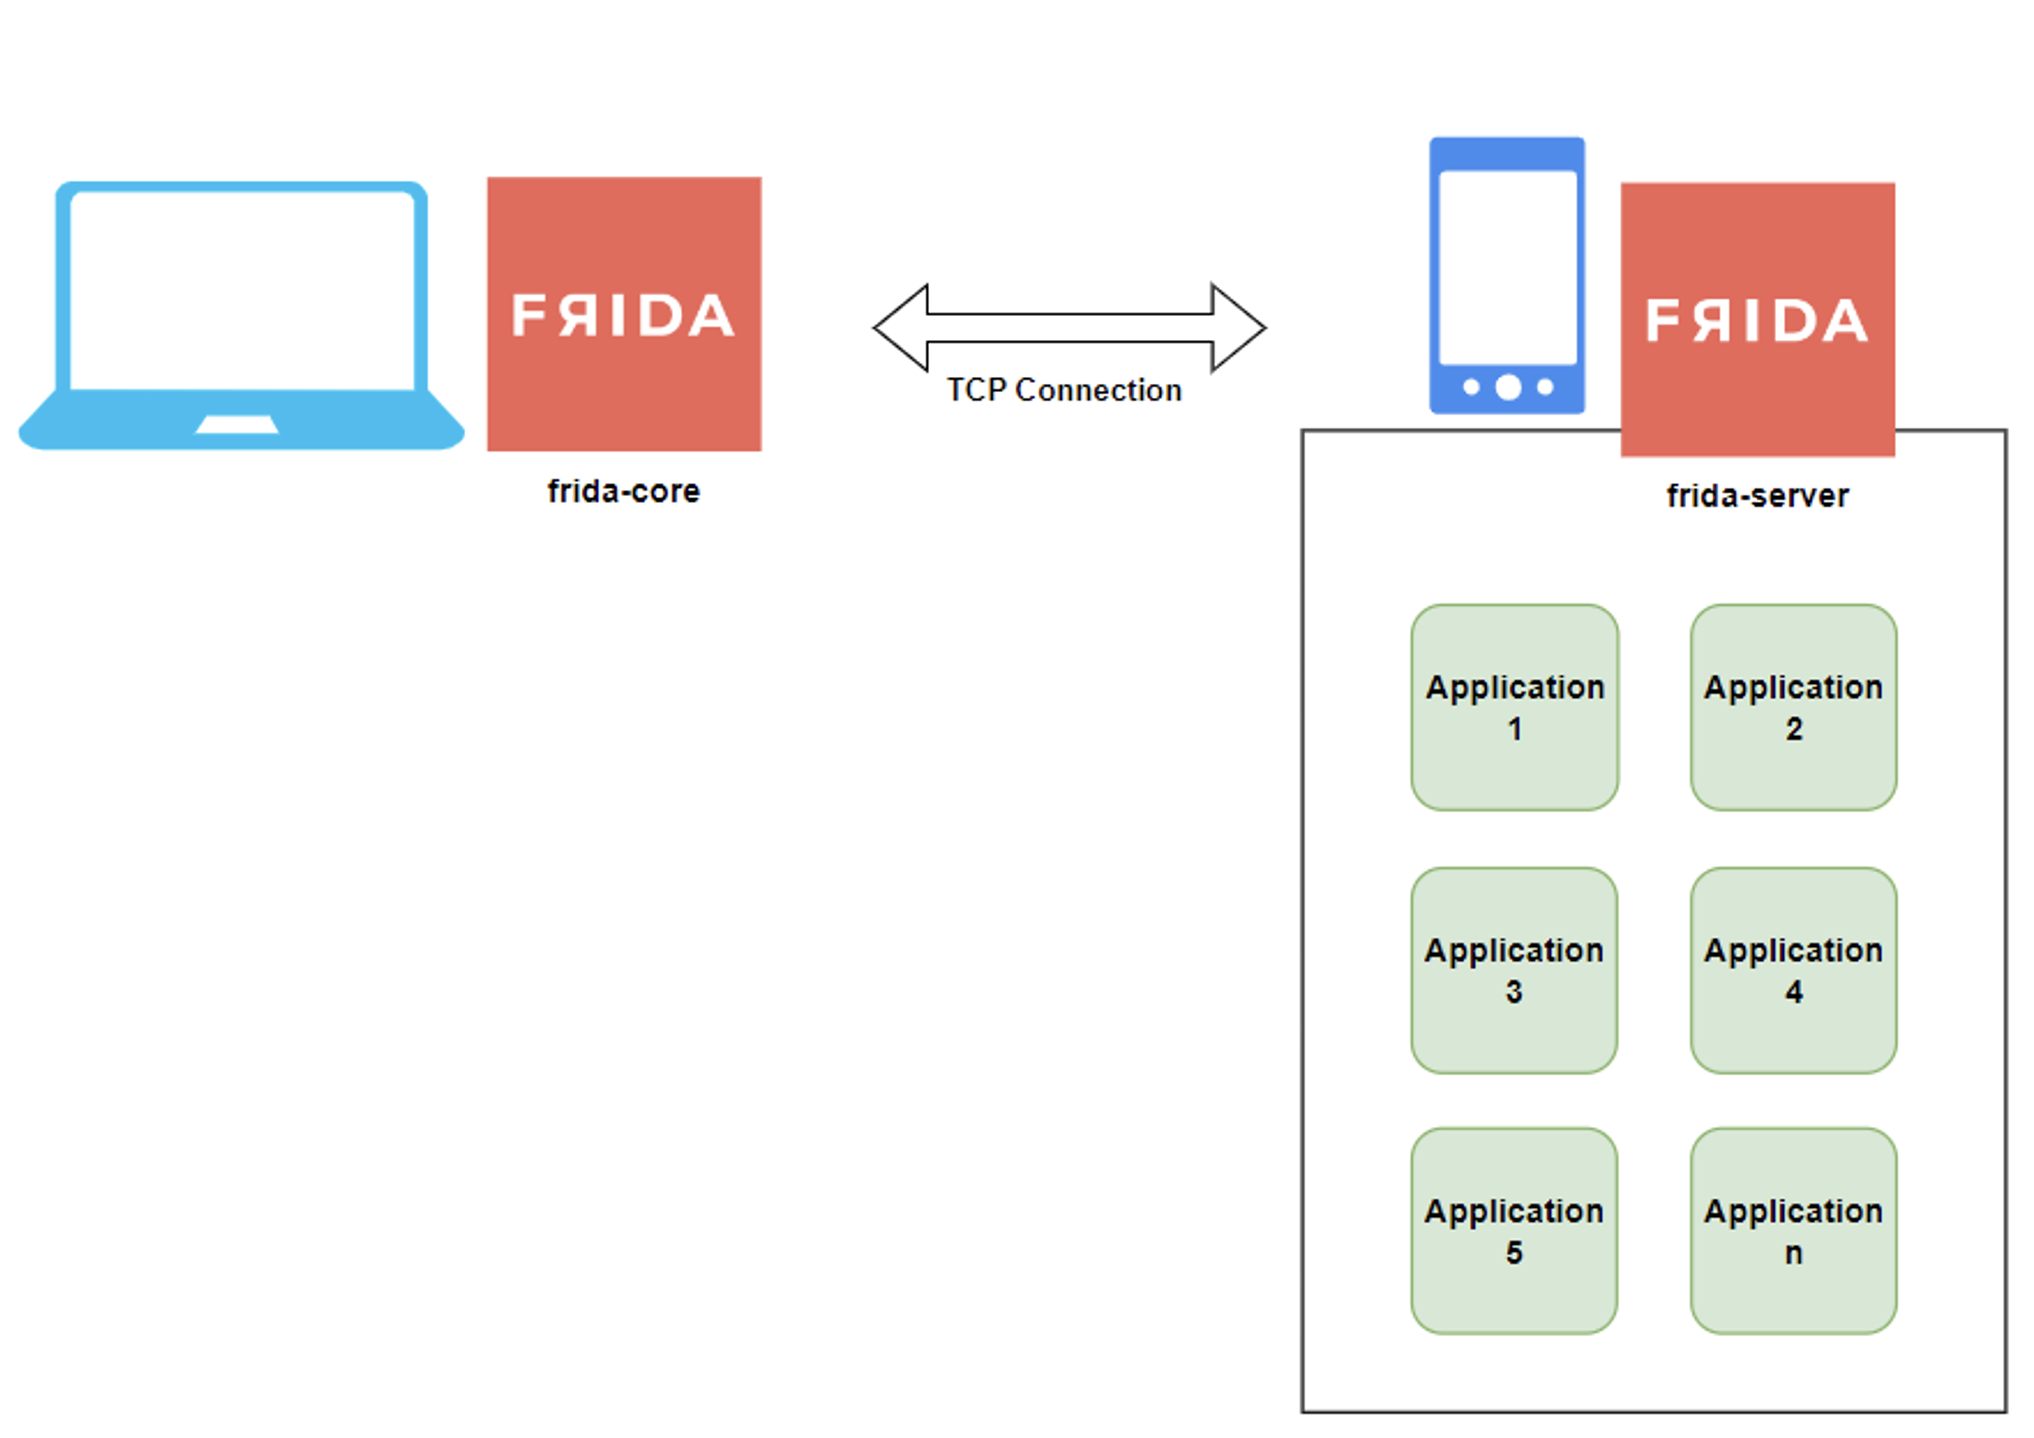
The first type of installation is called ‘Injected’. For this mode, the phone on which the pentester performs its tests must be rooted and the ‘frida-server’ component installed on it.
This is the most common case in mobile pentesting. This component, as its name suggests, is a Frida server that listens by default in TCP and localhost on port 27042.
The main advantage of this mode is that you only need to install the component once. Furthermore, it supports all the applications installed on the phone, allowing the pentester to hook into any application at any time.
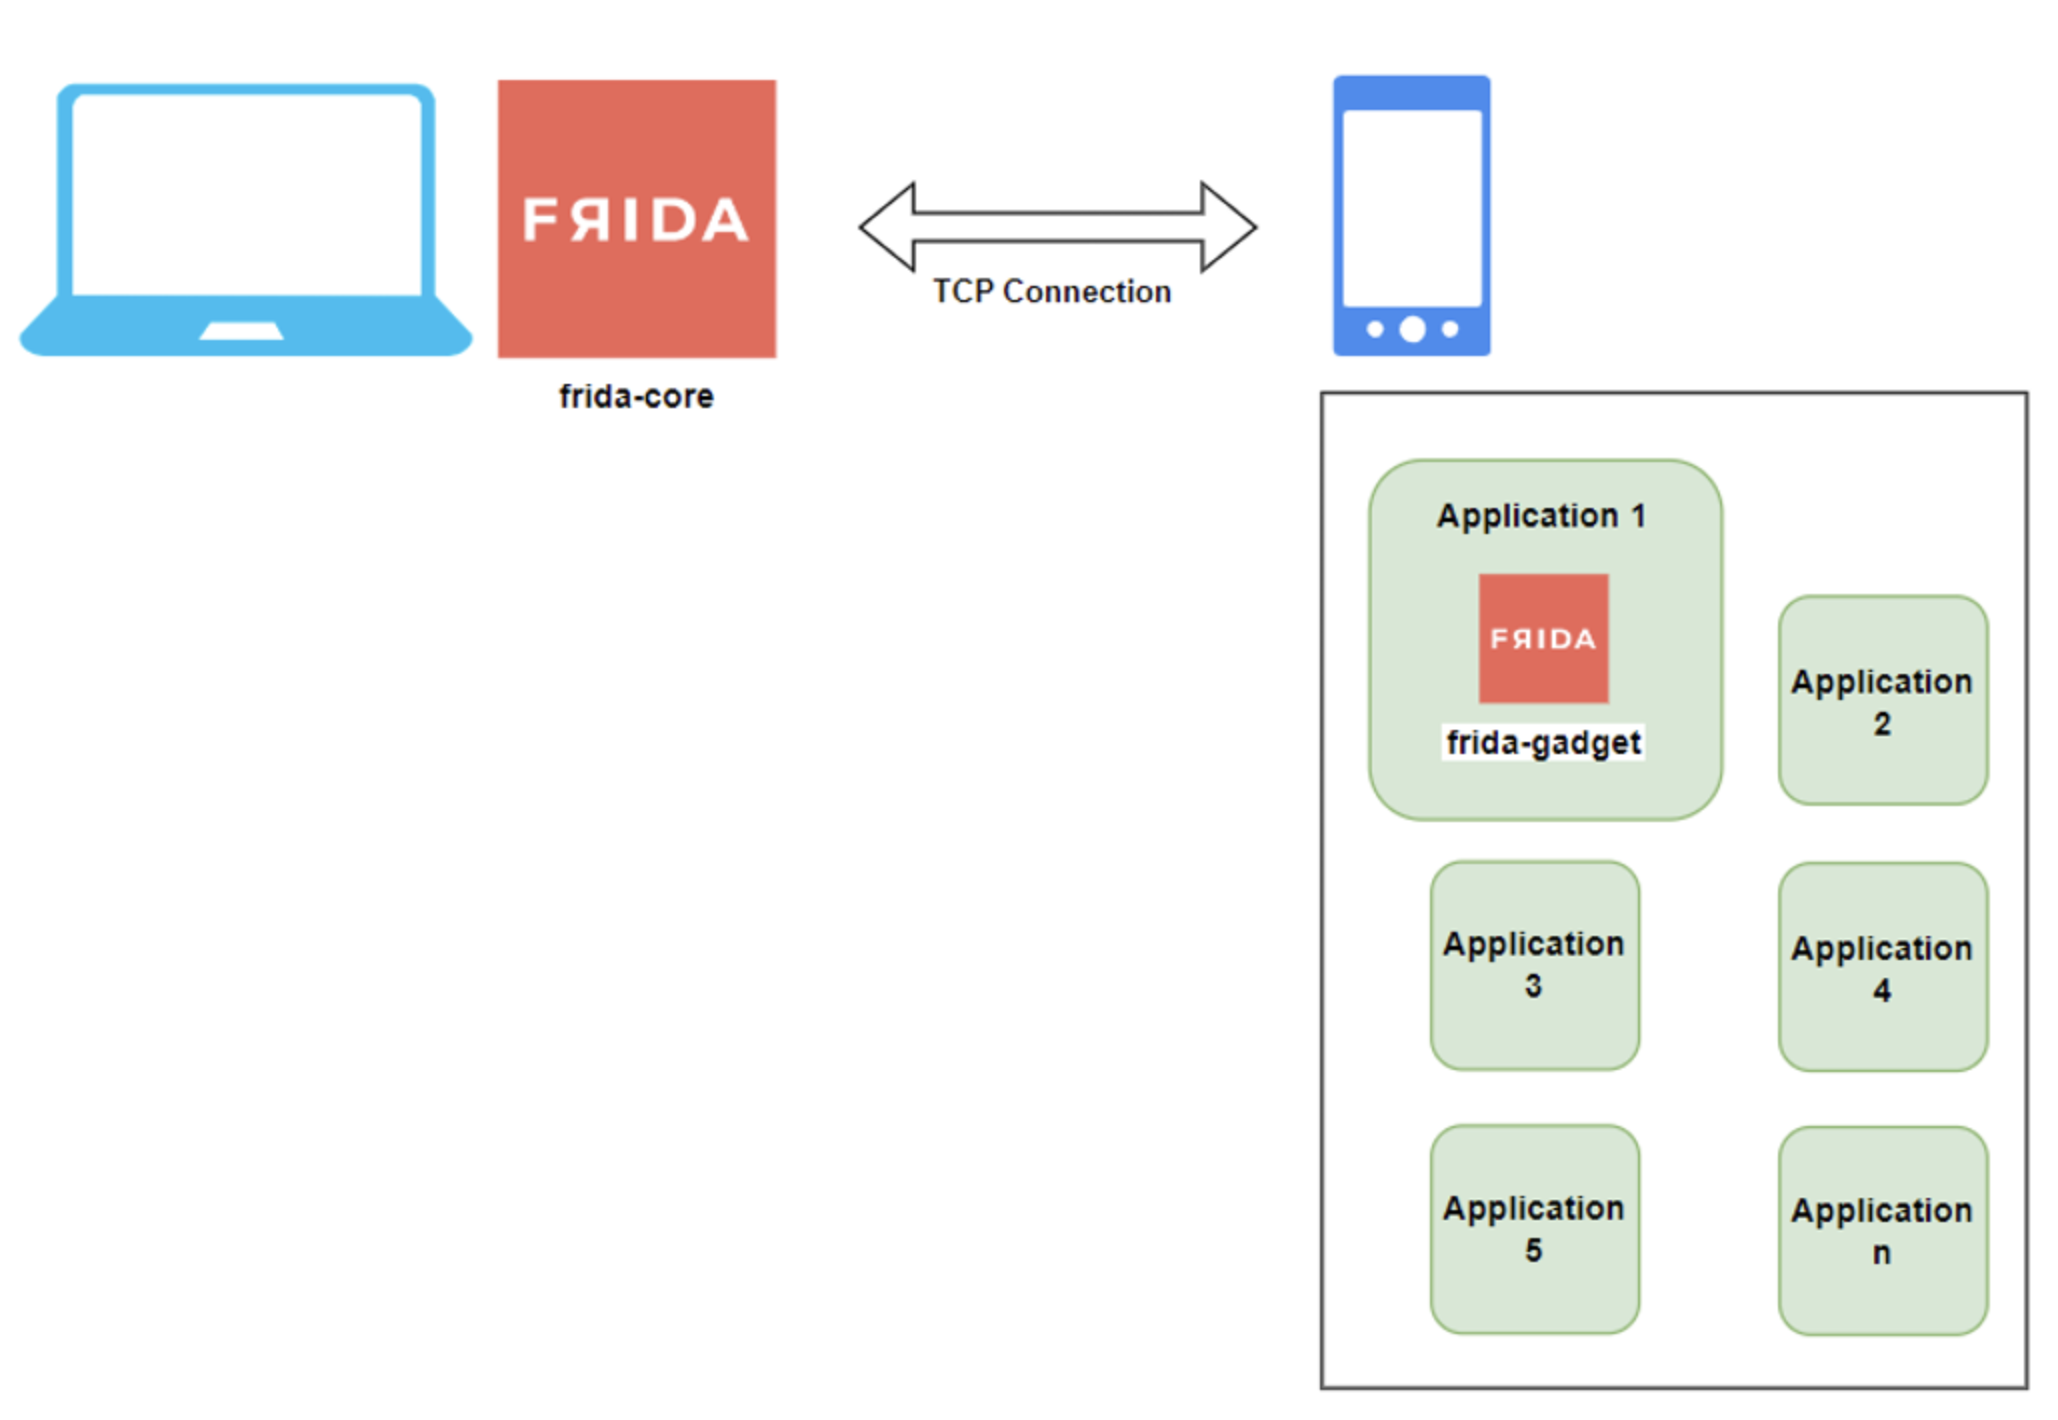
The second type of installation is called ‘Embedded’. This is useful when you want to use Frida on an application installed on an unrooted phone.
In this case, you need to integrate the ‘frida-gadget’ component directly into the target application. This involves patching the application, either automatically or manually, by decompiling the application, integrating ‘frida-gadget’ and then recompiling it.
The main advantage of this method is that it allows Frida to be used on unrooted phones. However, this process can be tedious if it has to be repeated for several applications. Moreover, depending on the application, the installation steps may differ or not work at all.
When Frida is installed, it incorporates various tools that can be used on the command line on the user machine, depending on the need.
In this section, we will look at the main Frida tools used during our mobile pentests and the associated commands.
The frida-ls-devices tool can be used to list the devices with which Frida can interact. To do this, simply use the following command:
frida-ls-devicesCommand result:
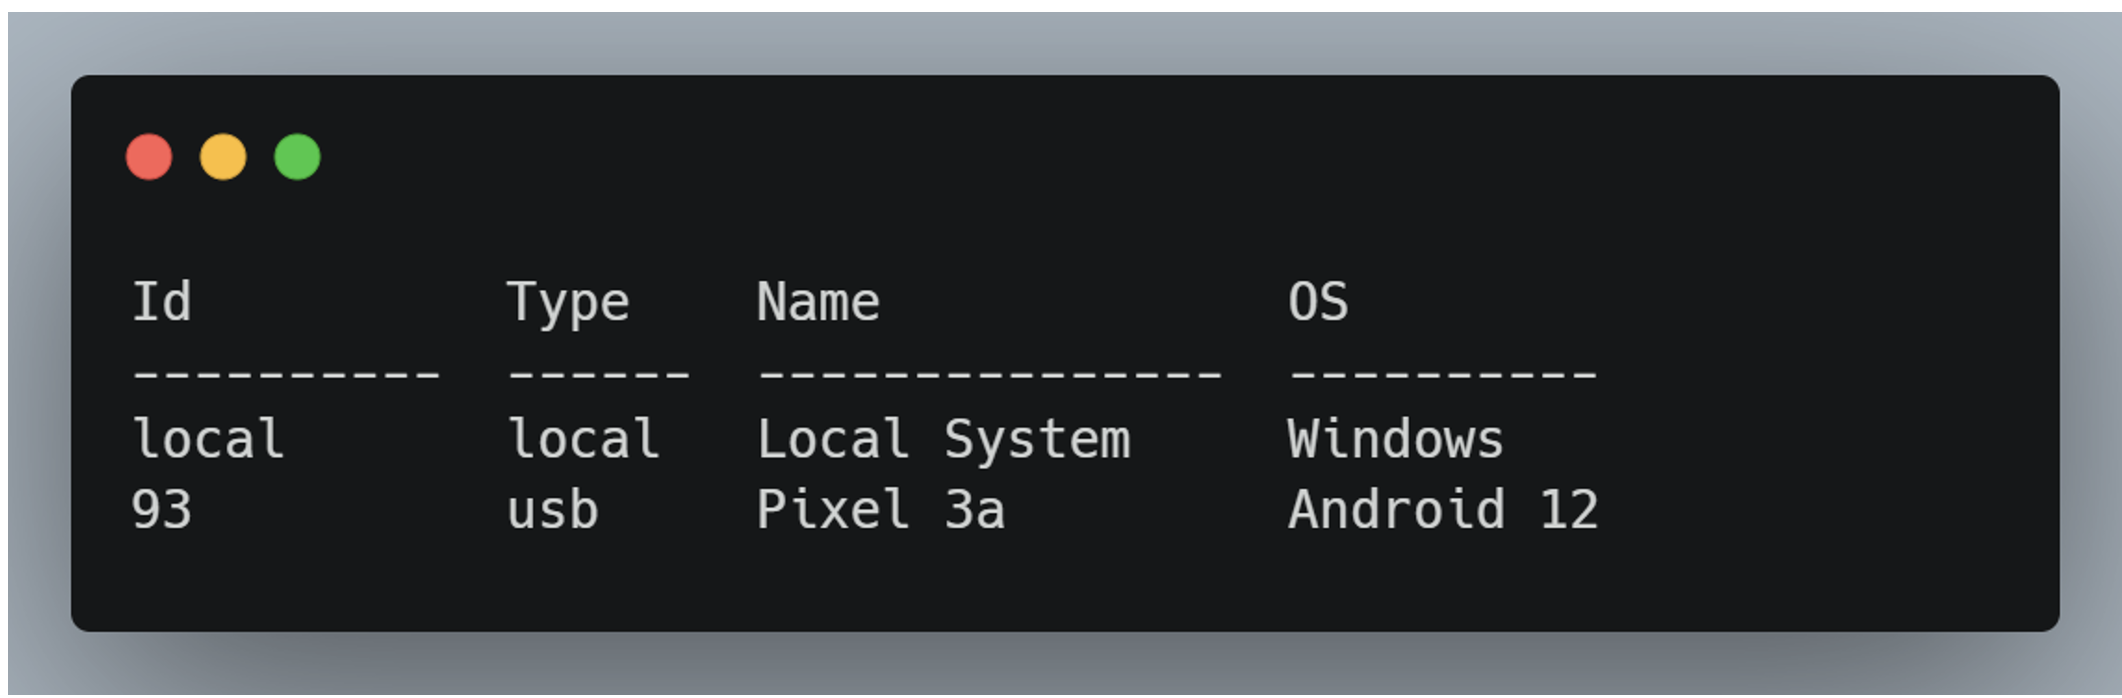
Here we can see that Frida is able to interact with two devices: the host machine, which is the user’s computer, and a mobile phone, connected via USB.
The frida-ps tool can be used to list the processes on a device, and in particular the applications installed. Below are the common commands used during a mobile pentest.
To list the processes of a device according to its ID (found with frida-ls-devices):
frida-ps -D <device_ID>To list the processes of the device connected via USB:
frida-ps -UResult of the two previous commands:
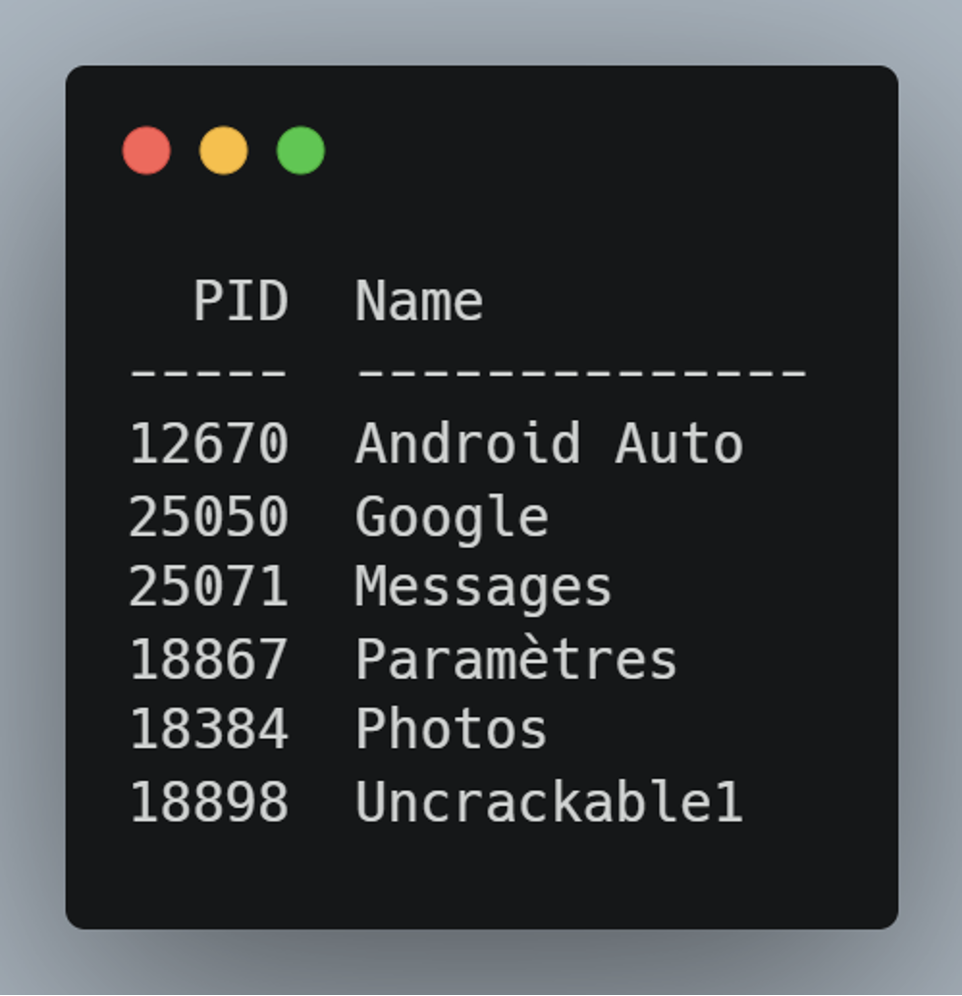
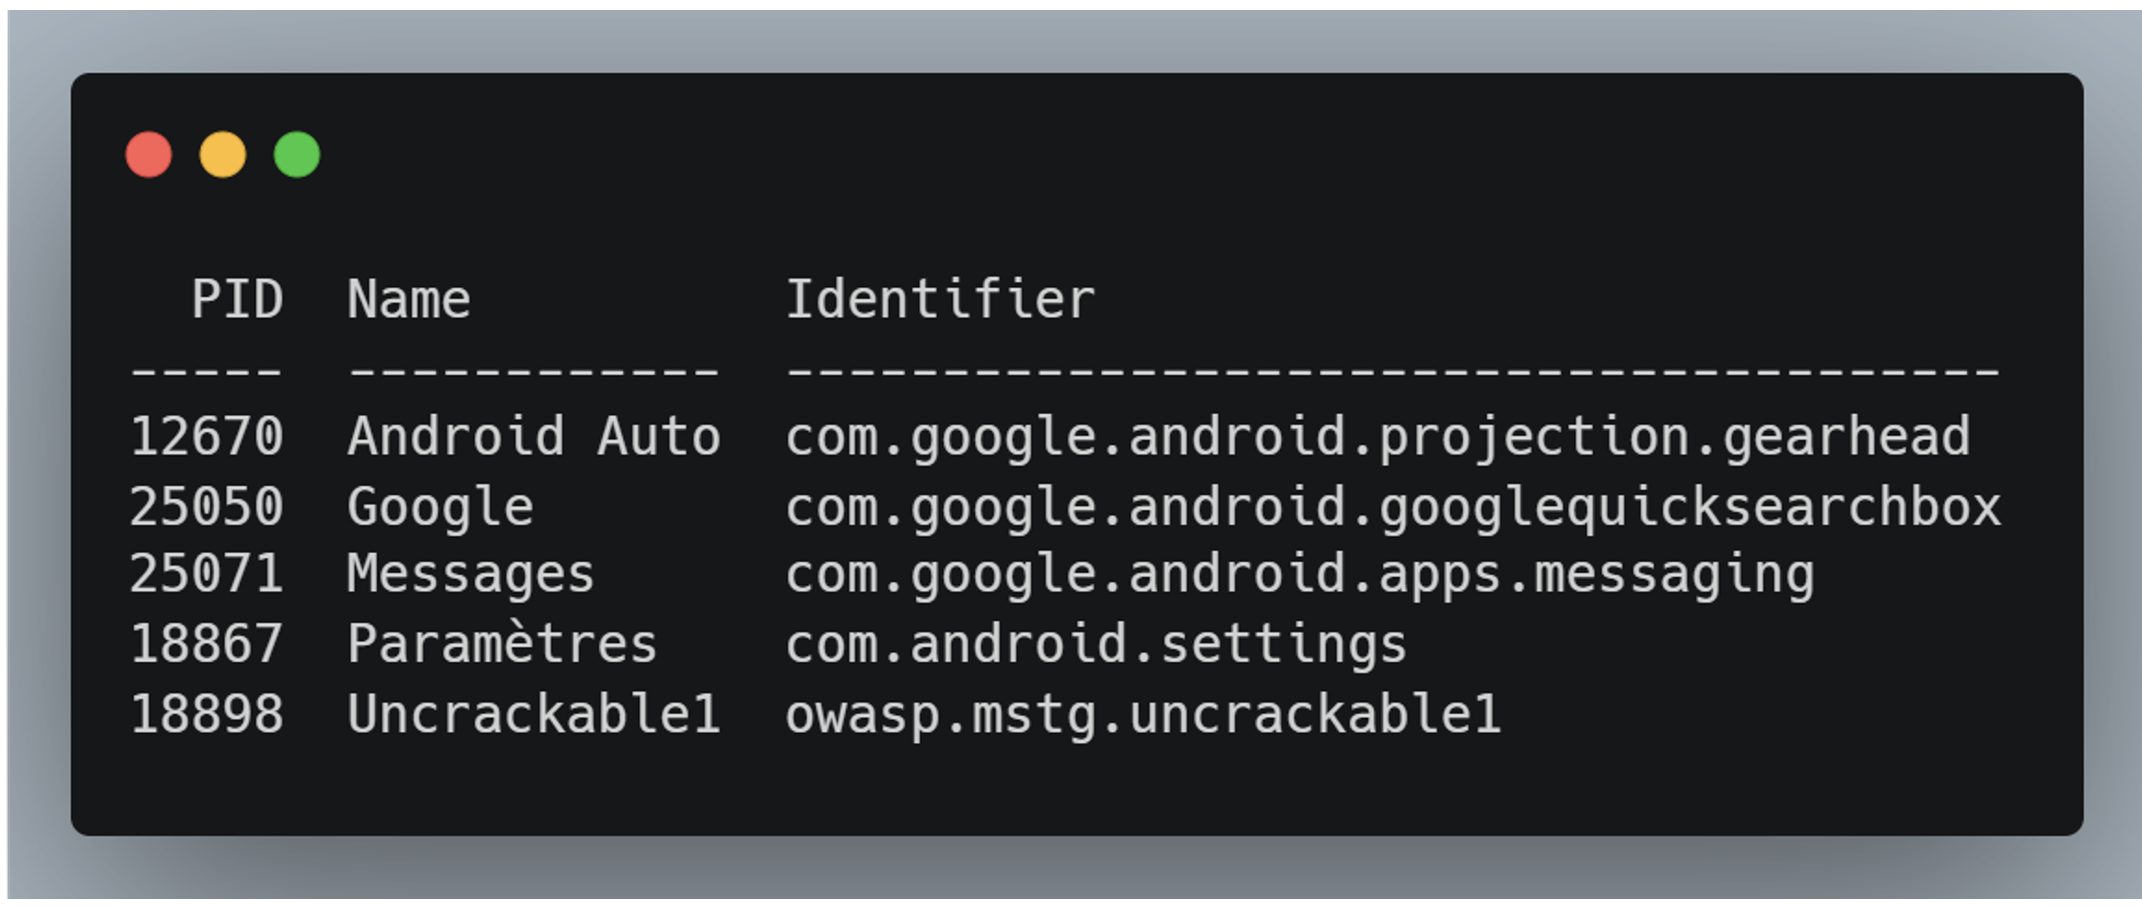
To list the applications running on the USB-connected device:
frida-ps -UaCommand result:
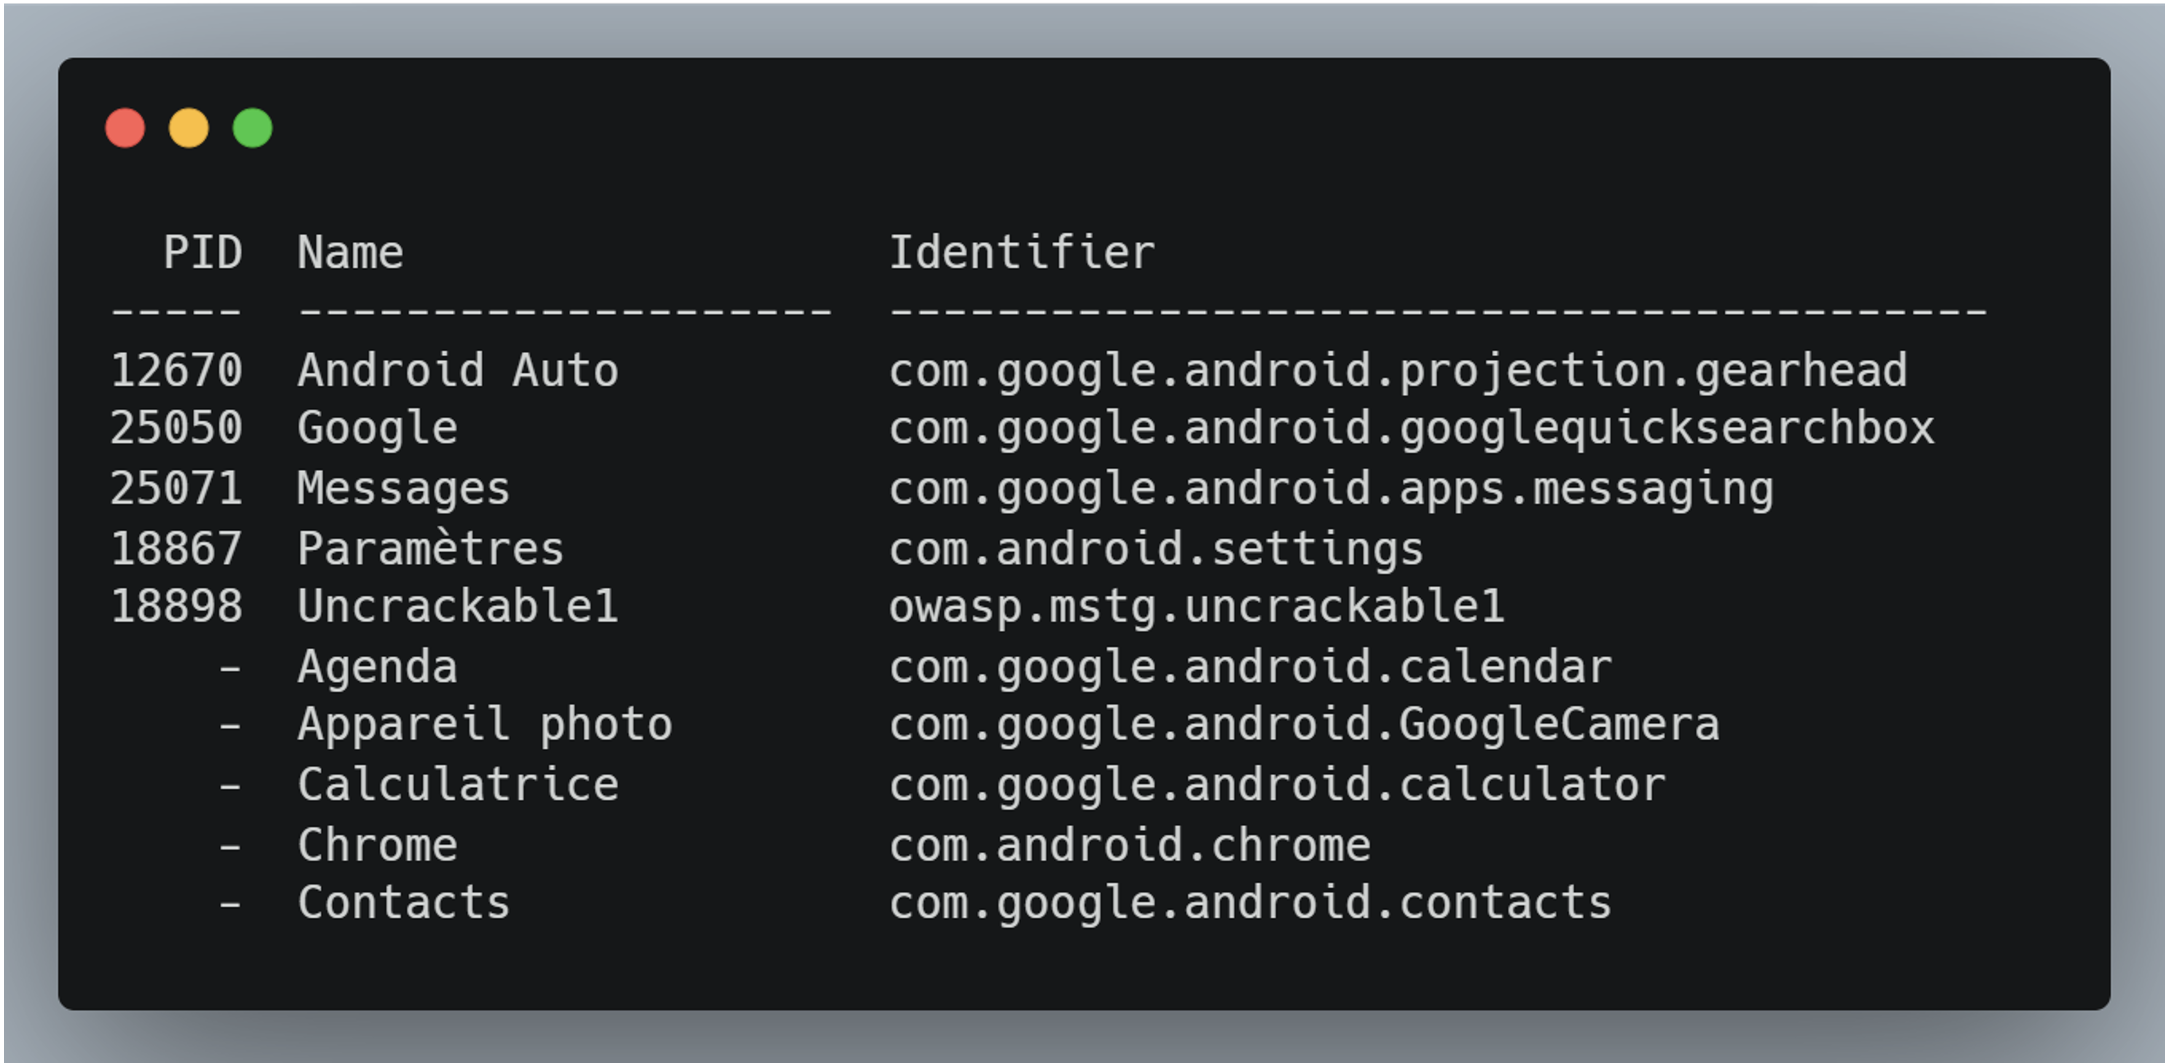
To list all the applications installed on the USB-connected device:
frida-ps -UaiCommand result:
The frida command offers many options, but is mainly used to inject JavaScript scripts, allowing you to modify the application’s behaviour at will.
Frida can be used to inject a script either at the start of a process (spawn mode) or on an existing process (attach mode).
In some cases, it is useful to execute the script as soon as the application is launched, for example to bypass security mechanisms that are activated as soon as the application is launched, such as SSL pinning or anti-root protection.
To inject a JS script at the start of a target process, on a USB-connected device:
frida -U -f owasp.mstg.uncrackable1 -l .scripts-fridabypass-root.jsHere, the -f option is used to inject itself when the process is launched. If the application is already running, the command will restart it.
Injection of a JS script on a target process already running, using its PID, on a USB-connected device:
frida -U -p 11316 -l .scripts-fridabypass-root.jsHere, we used the -p option to attach to the current process using its PID, but it is possible to do so using its Name, with the -n option, or its Identifier with the -N option. These options are the same for the frida-trace tool, which we will see later.
In the previous examples, the target application is owasp.mstg.uncrackable1 and its PID is 11316. The script used, bypass-root.js, was created by the attacker to bypass the controls that block the application if it is installed on a rooted device.
We will see later in this article a concrete example requiring the execution of this type of command.
frida-trace is a tool for dynamically tracing function calls. For example, sometimes an interesting feature is identified in the targeted application. In this case, it is interesting to find the method responsible for this functionality in the code.
This makes it possible to test whether changing the input or output values can alter the behaviour of the feature. frida-trace makes this process much easier, while offering great flexibility.
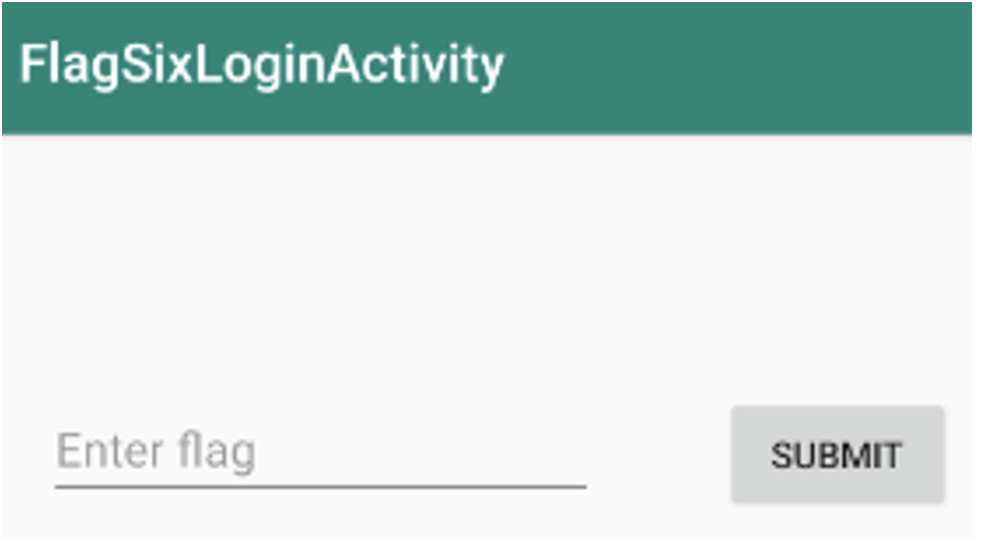
Let’s take the example of a button that validates or invalidates user input depending on its value. If the button displays ‘SUBMIT’, we can try to trace the method called when it is used by executing the following command:
frida-trace -U -N b3nac.injuredandroid -j "*!*submit*"In this command, we hook into the target application b3nac.injuredandroid, which is already running, using its identifier with the -N option.
With the -j option, we search all Java classes for methods whose name contains ‘submit’.
The syntax for this option is ‘java_class ! method_name’. Other options can be used, for example, to exclude certain methods from the search or to search for methods in other languages or libraries.
In this case, the result of the previous command is as follows:
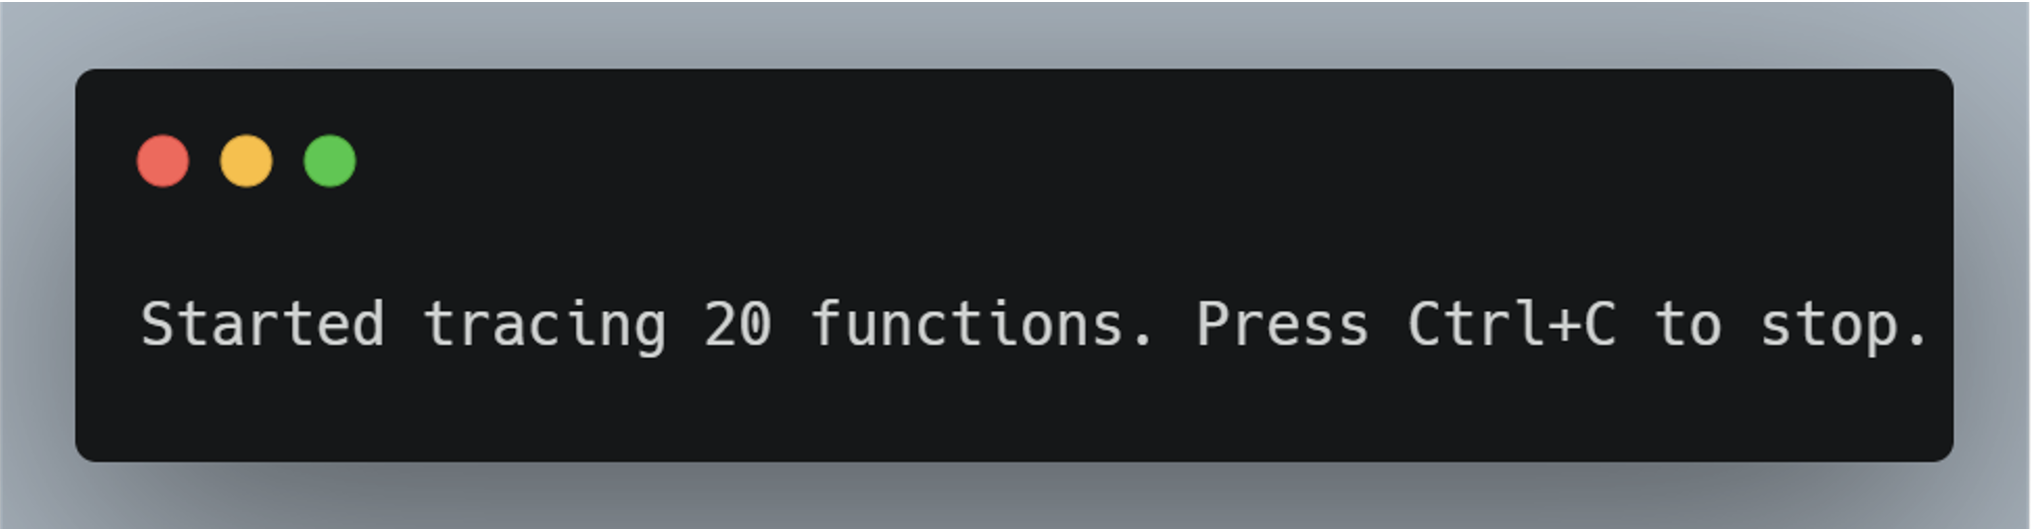
frida-trace found 20 methods containing ‘submit’ in their name. At the same time, it automatically generated a JavaScript script for each method identified.
These scripts can then be modified to change the input and output values of each method.
When we click on the button on the application, the following output is returned:

We now have the name of the class, FlagOneLoginActivity, and that of the method, submitFlag, which are responsible for the button.
To change the input or output variables for this method, simply edit the file generated by frida-trace or create a JS script to hook into the method. We’ll see how to do this in the next section.
Let’s imagine an application in which the user has to provide a flag to validate an action by clicking on a button, as illustrated in the image below:
As we saw earlier in this article, thanks to frida-trace we have identified the submitFlag method in the decompiled code, which is called when the button is clicked:
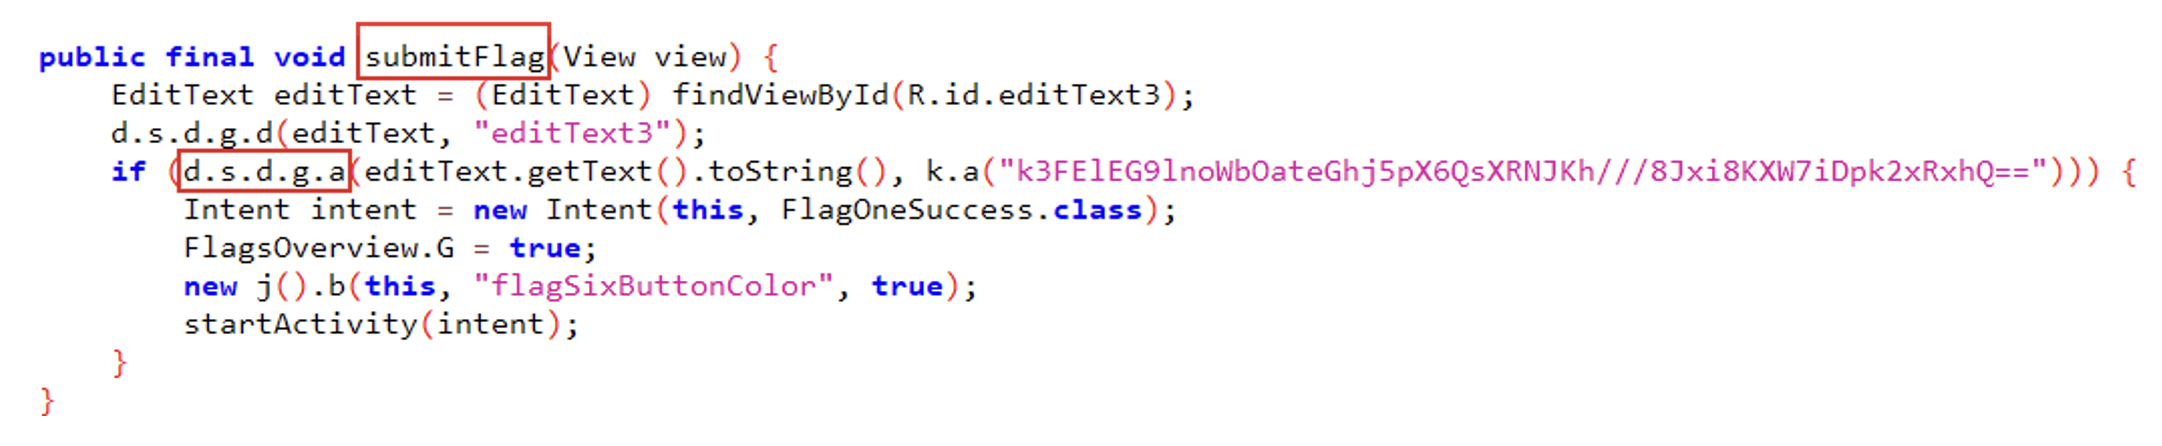
Here, we can see that if the a method of the d.s.d.g class returns true, then flag validation is bypassed and the challenge will be considered successful by the application. To force the method to send true, we can run frida-trace again, but this time on the a method.
In this way, frida-trace will automatically generate a JS script, allowing us to dynamically modify the variable returned by the method.
So we run the following command:
frida-trace -U -N b3nac.injuredandroid -j "d.s.d.g!a"Next, we go to the file generated by frida-trace, which can be found at ‘…/ handlers/d.s.d.g/a.js’:
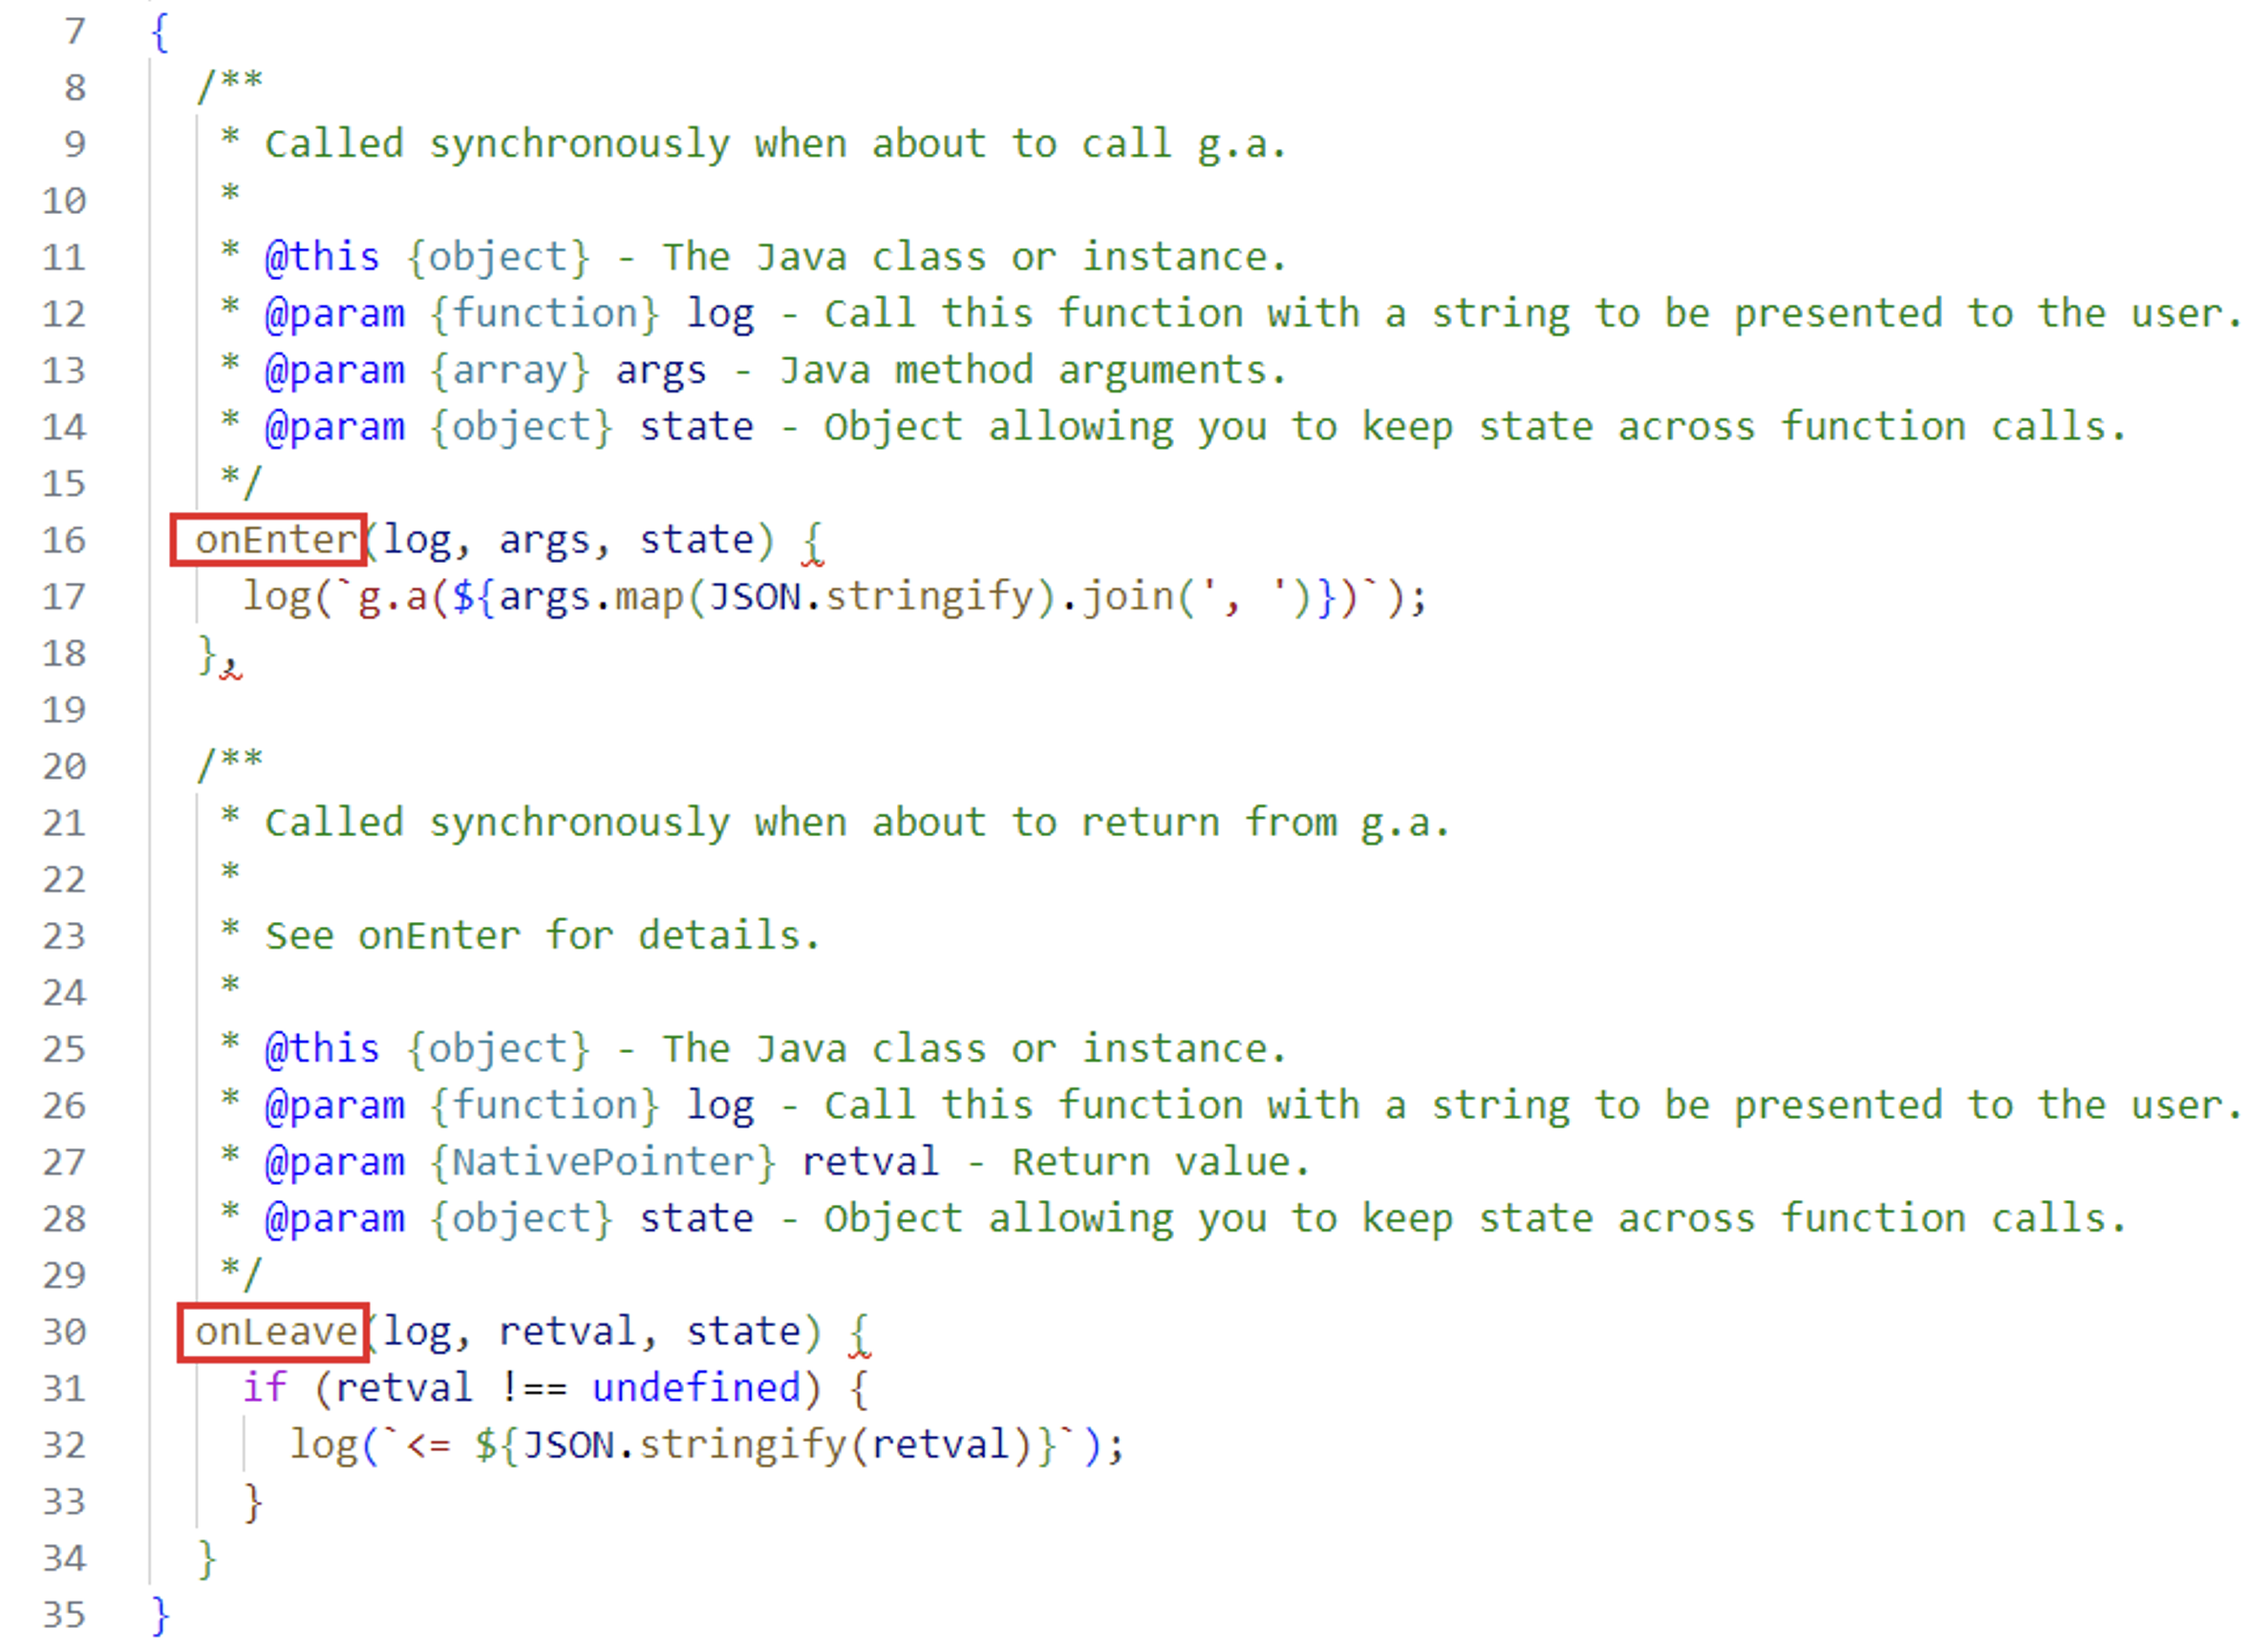
We can see the onEnter and onLeave functions in the Frida JavaScript API. These are used to modify the input and output variables of the a method.
To force the method to always return true, we can write return true in the onLeave function:

If the value returned had been ‘1’ instead of ‘0’, we could have written retval.replace(1).
After saving the script and clicking on the button with an invalid flag value, the application considers that we have still succeeded in the challenge:
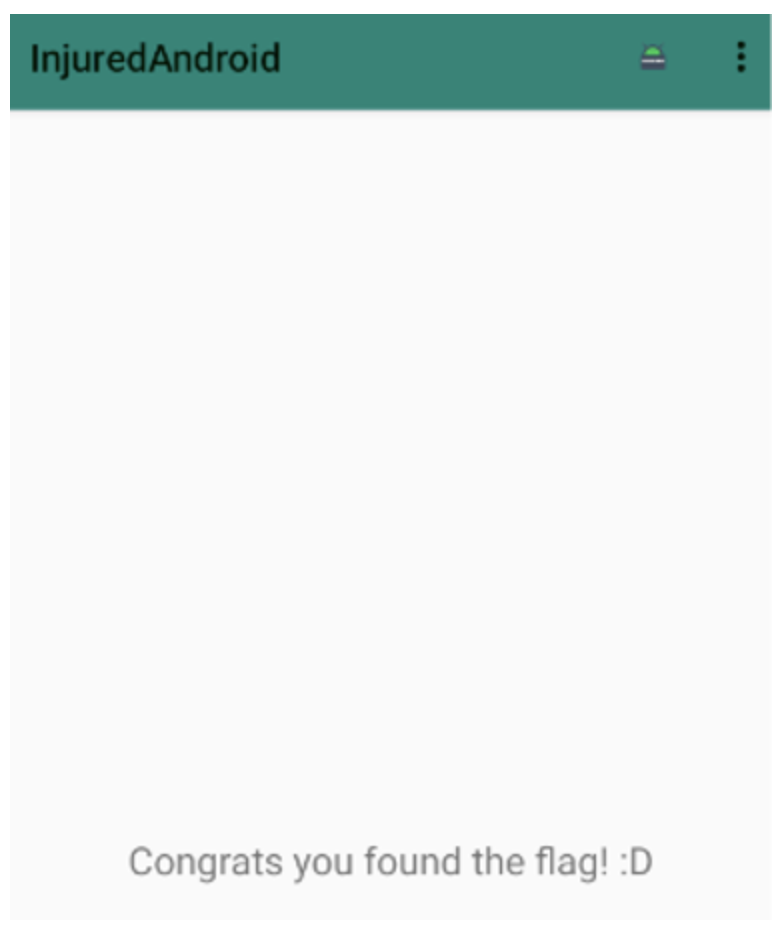
It is important to note that the original aim of this exercise was not to bypass flag validation, but rather to discover the value of the flag. However, we have bypassed flag validation in this example to illustrate an exploitation method using frida-trace.
This same approach can also be used to bypass critical functionality, such as PIN validation in a banking application, for example.
One of the main components of Frida is its JavaScript API. This allows you to create custom scripts to interact dynamically with the methods of a target application.
In this section, we’ll explore some examples of how this can be exploited in an Android environment.
When a method is identified, it can be called directly using the API function, Java.use and the implementation property.
To illustrate this, we can go back to our previous scenario using the scripts generated by frida-trace.
As a reminder, with the following code, if the a method of the d.s.d.g class returns true, then flag validation is bypassed and the challenge will be considered successful by the application:
This time, we’re writing our own JS script to force the a method of the d.s.d.g class to return true, using Java.use and implementation :
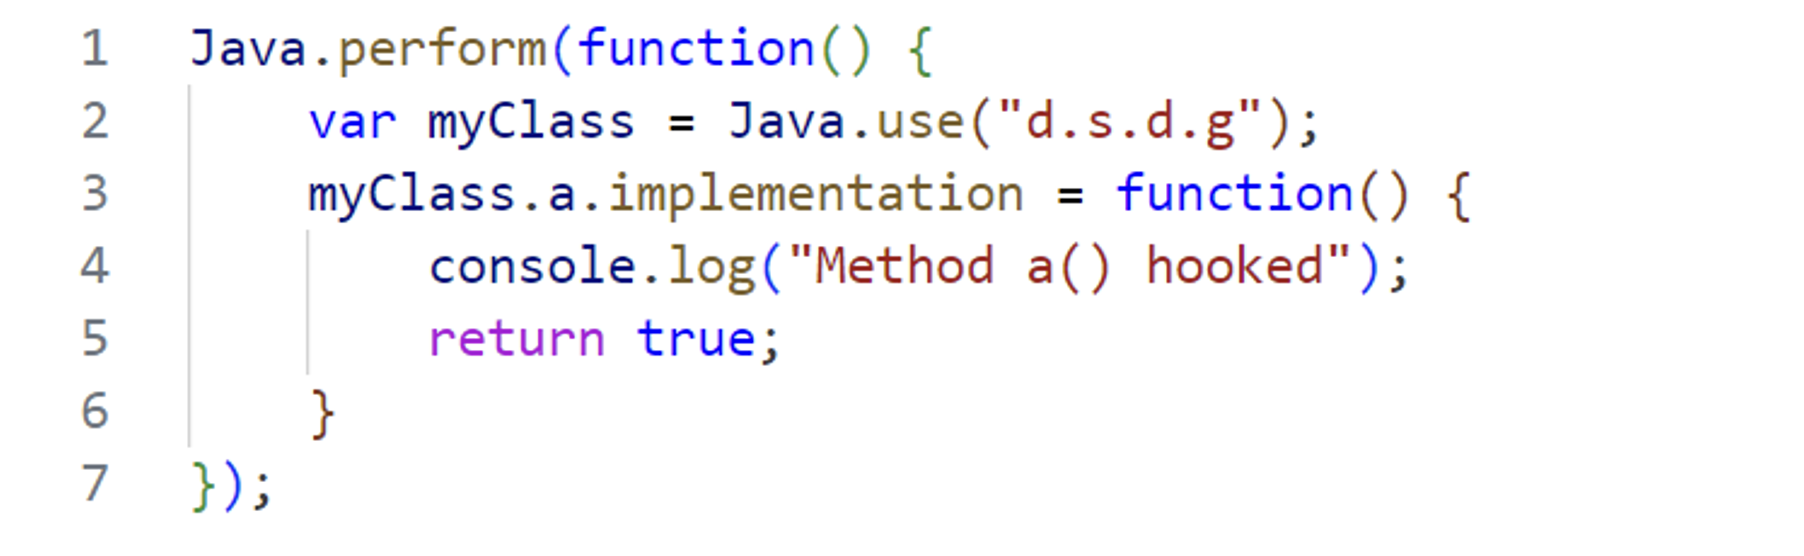
With Java.use, we select the class and then dynamically rewrite the method using implementation.
Then, with the following command, we can inject ourselves into the application with the script we’ve just created:
frida -U -N b3nac.injuredandroid -l .scripts-fridabypass.jsWhen we click on the button in the application, we manage to bypass the flag validation and the application considers that we have succeeded in the challenge.
In the Frida console, we can see that we have hooked the a method.
Now that we’ve seen how to bypass validation, let’s try to retrieve the value of the flag.
As a reminder, if the condition in the previous examples is true, then the challenge is true. If we take a closer look at this same condition, we can see that the condition is true if the user input is equal to the result returned by the a method of class k with the string ‘k3FElEG9lnoWbOateGhj5pX6QsXRNJKh///8Jxi8KXW7iDpk2xRxhQ==’ as the argument:

Here is the decompiled code of this a method:
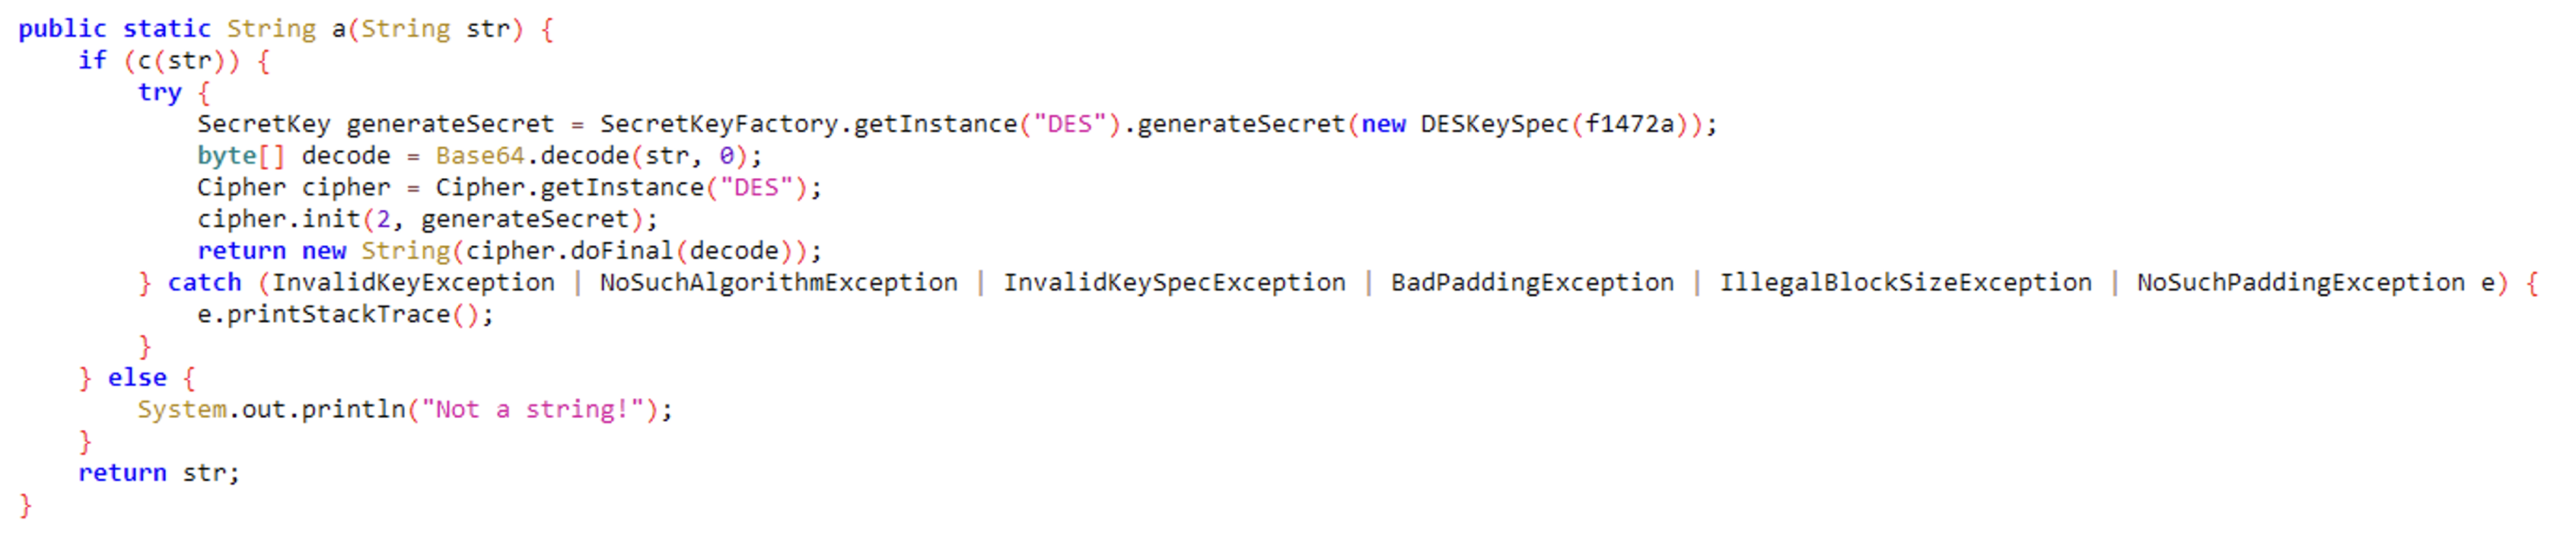
A quick look reveals that this is a method that decrypts the character string passed as an argument.
To retrieve its result, instead of trying to retrieve the private key, which can be obfuscated, and decrypt the string manually, let’s just use a few lines of JavaScript and let Frida do its work!
Here’s the JS script we’ll inject with Frida:
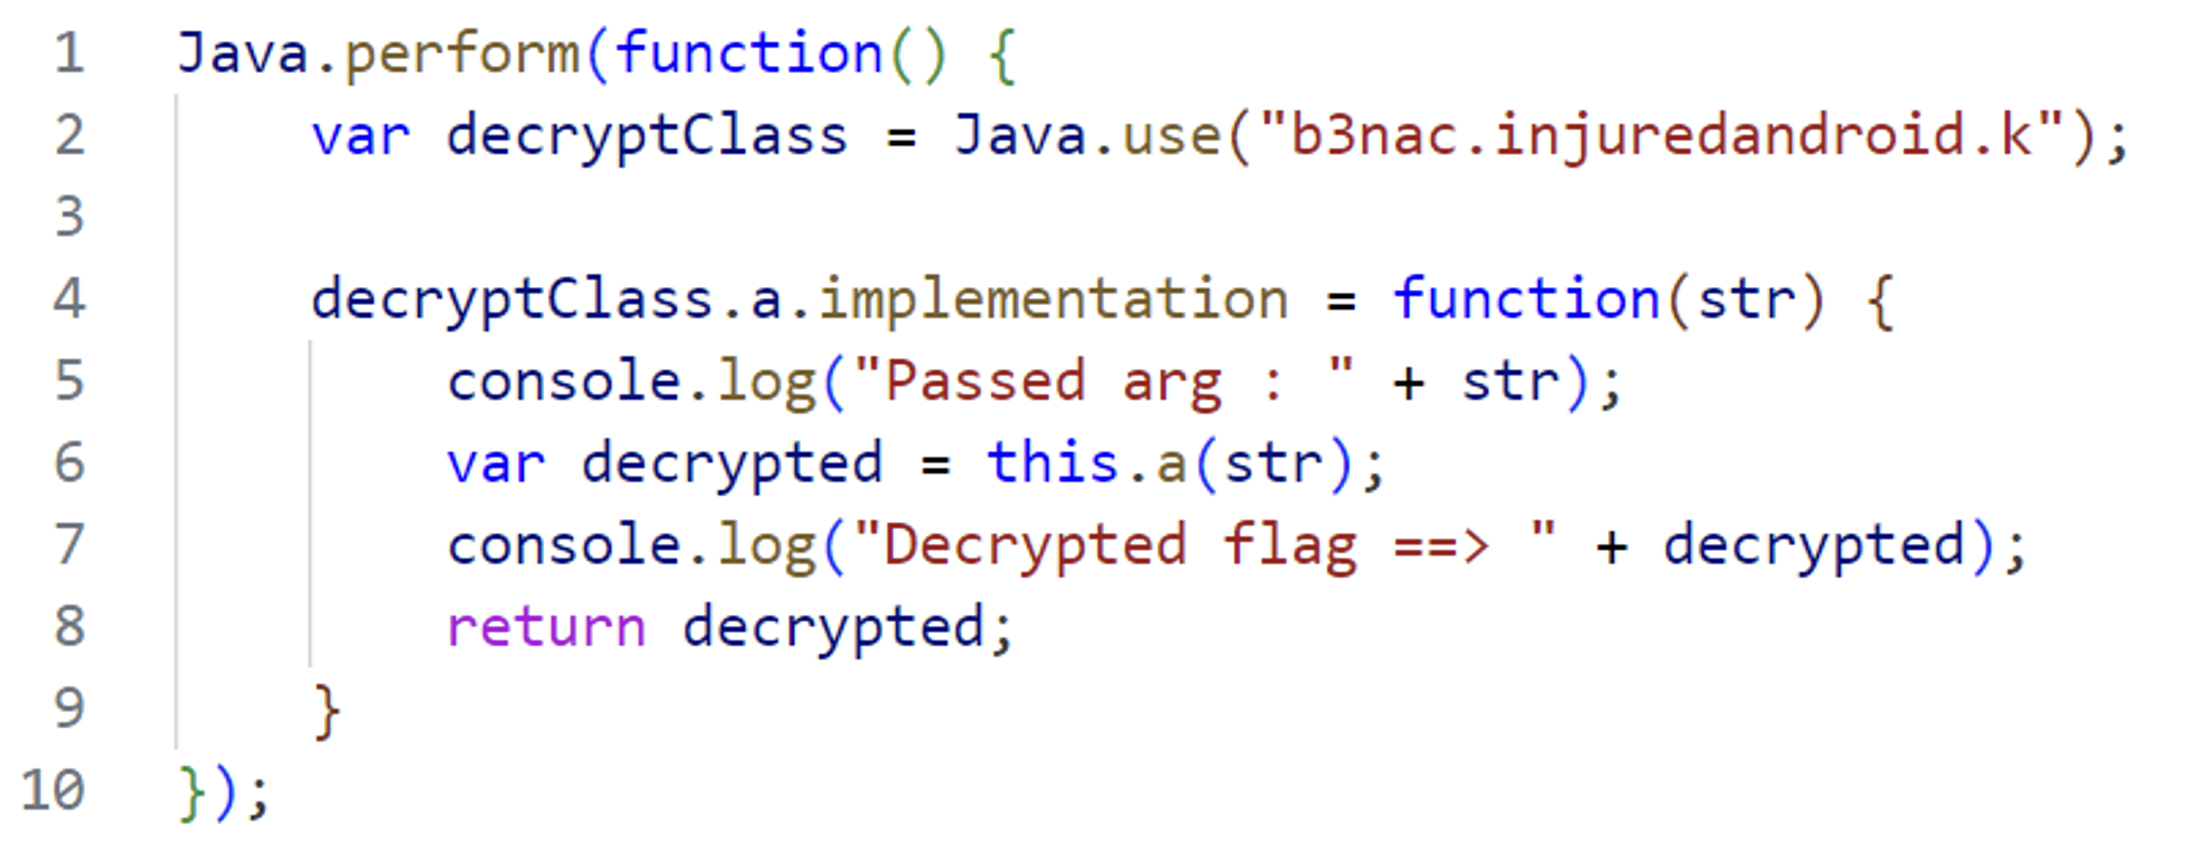
As before, we target the k class with the Java.use function.
Then we dynamically rewrite the a decryption function, using it and passing the string to be decrypted as an argument.
We then display the encrypted and decrypted strings in the console.
Finally, we return the decrypted result so as not to break the logic of the original code, which expects the decrypted result in return.
The following command is used to inject our script:
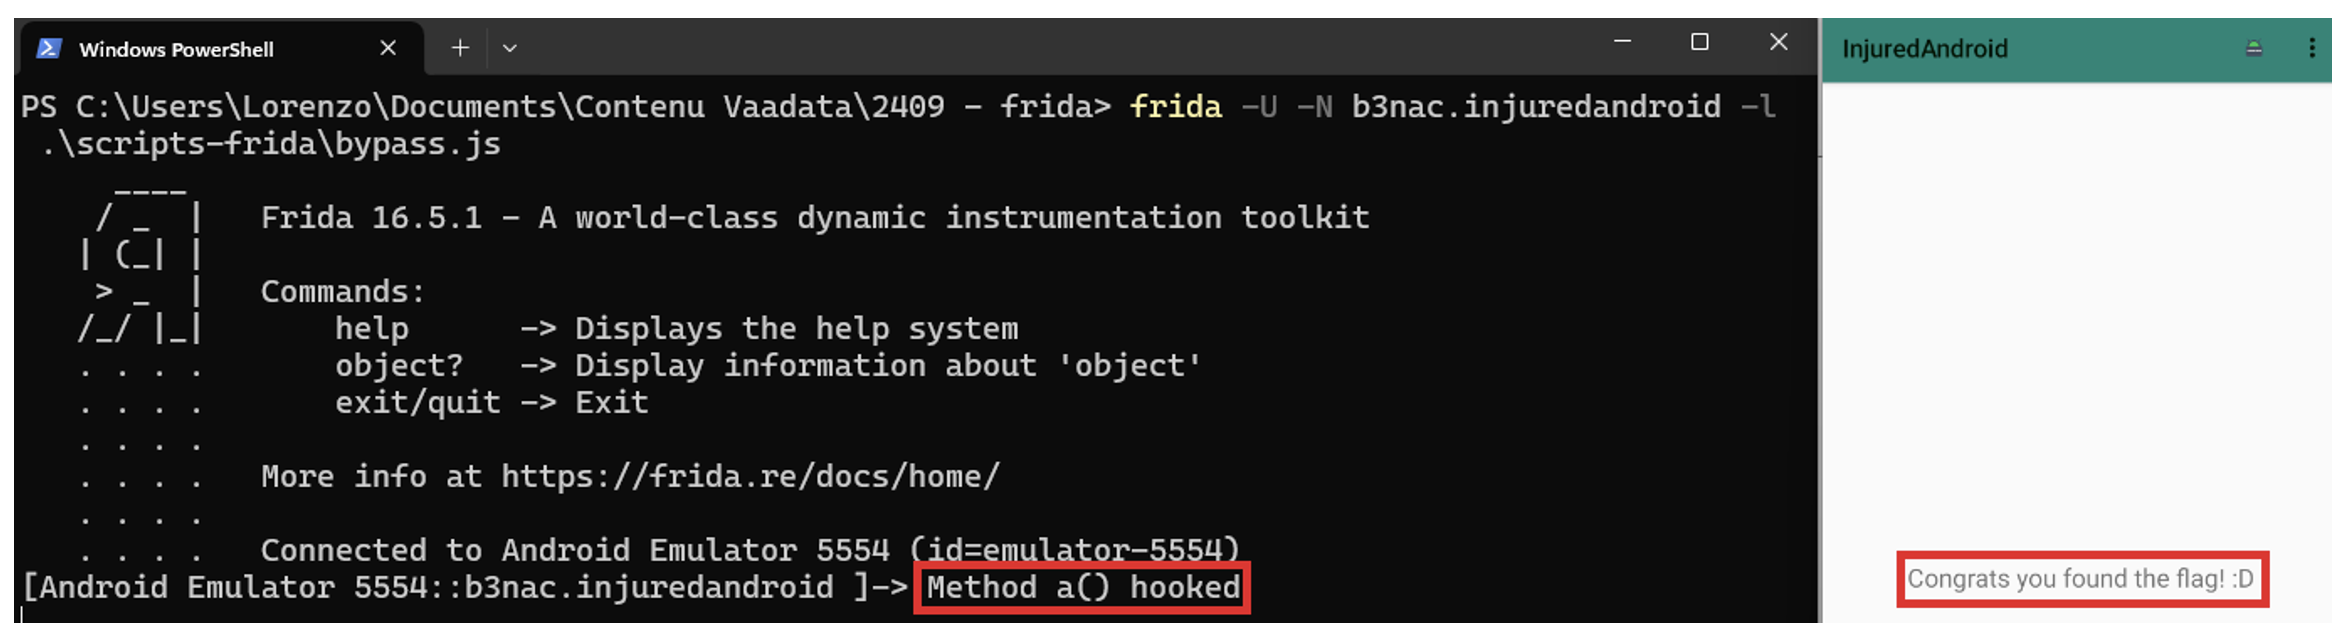
frida -U -N b3nac.injuredandroid -l .scripts-fridainjuredAndroidFlag6.jsWhen we click on the button, we see the encrypted and decrypted flag in the console:

If you don’t want to write your own scripts, as mentioned above, you can take advantage of the many scripts already developed by the Frida community. They are available on Frida CodeShare or on various repositories.
These scripts are often designed to solve recurring problems encountered with mobile pentests. For example, it often happens that an application uses a protection system against ‘Man in the Middle’ attacks, preventing an attacker from intercepting HTTP traffic between the application and its servers. This mechanism is called ‘SSL Pinning’.
However, during a mobile penetration test, it is crucial to intercept and analyse the traffic. If the application under test uses SSL Pinning, it is therefore necessary to bypass this protection. Although this can be complex in some rare cases, most of the time it can be done using simple community scripts to disable this protection.
Another example of a test to be carried out during an audit is to check whether passwords and other sensitive information are stored securely, such as in encrypted Shared Preferences. To do this, it is useful to dynamically track the path taken by the password when it is entered into the application.
To make this task easier, the community has developed scripts to analyse the system files called up by the application in real time. For example, if, when running this type of script, we see that the encrypted Shared Preferences file is opened when we enter a password, this means that the password is stored securely.
The Frida community is therefore an excellent resource for saving time and improving efficiency. However, always be vigilant and check the code carefully before executing it!
Frida is a powerful tool that can be used on both mobile platforms and other systems. Its flexibility and modularity make it an essential ally for mobile security audits.
Its power is enhanced by an active community, which develops a wide variety of scripts to meet the countless use cases encountered.
We’ve explored a few concrete examples of how Frida can be used, and we hope this will inspire you to take your mastery of this tool even further.
Author: Lorenzo CARTE – Pentester @Vaadata


