In an office environment, user workstations generally use Windows operating systems and therefore authenticate using protocols developed by Microsoft.
And to centralise authentication management, Microsoft provides its Active Directory (AD), which is based on the Kerberos protocol. However, some machines do not implement this protocol and some networks simply do not have an Active Directory. In these cases, there is the NTLM protocol, which can work between two machines without AD or via the Netlogon process.
In this article, we will explain how NTLM authentication works and present one of the most common attacks on this protocol: NTLM Relay attacks.
Comprehensive Guide to NTLM Authentication and Relay Attacks
What is NTLM?
NTLM (New Technology LAN Manager) is a suite of authentication protocols developed by Microsoft to confirm the identity of users and protect the integrity and confidentiality of their activities on a network.
Authentication takes place through direct communication between a client and the target server, commonly known as NTLM challenge/response.
In addition, NTLM is included in most of the well-known protocols such as HTTP, SMB, FTP, SQL, LDAP, etc. On the other hand, it is important to note that all client-server exchanges are carried out in the clear over the network.
So, in theory, a Man in the Middle (MiTM) attacker can intercept and replay all communications. But there are many tried and tested solutions for securing this authentication and countering this encryption flaw.
How does NTLM Authentication Work?
The principle of NTLM authentication is as follows:
- First, the client tells the server that it wants to authenticate.
- The server then responds with a challenge, which is nothing more than a random string of characters.
- The client then encrypts this challenge with its secret (NT hash of its password), and sends the result back to the server.
NB: The NT hash is often mentioned with the LM hash. And even though the LM hash is no longer used by recent Windows systems, it may still be present in the file system for the sake of backward compatibility.
The LM hash was the old Windows method for storing passwords.
However, it had a number of disadvantages. It only considered the first 14 characters of the password and was not case-sensitive. This method was therefore abandoned with each successive version of Windows and the NT hash has become the default storage method since Windows Vista.
- Finally, the server performs the same operation with the password hash corresponding to the domain name and the user name wishing to authenticate. It then compares the result with the one sent by the client. If the comparison is valid, the client is authenticated on the server. This operation is possible because Windows stores the condensed (NT and LM) local and remote user passwords in the SAM (Security Account Manager) database.
The advantage of this exchange is that it enables authentication without disclosing the user’s password. This is known as zero-knowledge proof, which enables users to prove that they really do hold their secret without ever sharing it.
However, the expression “NTLM hash” is often used, which is a misuse of language. Some people refer to the response to the challenge as the “NTLM hash”, while others refer to the NT condensate of the user’s password as the “NT hash”.
To avoid confusion between the NTLM protocol, the NTLM challenge response, and the NT condensate of the user password, we will use the following terms:
- NTLM challenge response = NET-NTLM hash
- NT Condensate = NT hash
NTLM: one authentication protocol, two versions (NTLMv1 and NTLMv2)
The NTLM protocol comes in two versions with the same operating principle but a different method of calculating the NET-NTLM hash.
The second version of the protocol was released because the NET-NTLMv1 hash was too easily reversible to recover the original password (less than one day for an 8-character password).
NTLMv2 makes it possible to solidify the hash by making it more difficult to recover a password, even if you have the NT-NTLM hash.
In addition, NTLMv2 introduces the notion of a signature to verify the integrity of the NTLM challenge, which greatly reduces the possibility of compromise.
NTLMv1
Net-NTLMv1 hash calculation:
C = 8-byte server challenge, random
K1 | K2 | K3 = LM/NT-hash | 5-bytes-0
response = DES(K1,C) | DES(K2,C) | DES(K3,C)
Example of a hash:
netntlm::kNS:338d08f8e26de93300000000000000000000000000000000:9526fb8c23a90751cdd619b6cea564742e1e4bf33006ba41:cb8086049ec4736cNTLMv2
Net-NTLMv2 hash calculation:
SC = 8-byte server challenge, random
CC = 8-byte client challenge, random
CC* = (X, time, CC2, domain name)
v2-Hash = HMAC-MD5(NT-Hash, user name, domain name)
LMv2 = HMAC-MD5(v2-Hash, SC, CC)
NTv2 = HMAC-MD5(v2-Hash, SC, CC*)
response = LMv2 | CC | NTv2 | CC*
Example of a hash:
admin::N46iSNekpT:08ca45b7d7ea58ee:88dcbe4446168966a153a0064958dac6:5c7830315c7830310000000000000b45c67103d07d7b95acd12ffa11230e0000000052920b85f78d013c31cdb3b92f5d765c783030However, even if it takes longer to recover a password from a NET-NTLMv2 hash, it is still possible using tools such as hashcat. In fact, as with any type of hash, it is the complexity and length of the password and the computing power of the machine used that will be decisive.
In this article, we will not dwell on this type of attack. There are other techniques for abusing NTLM authentication, such as NTLM relay attacks.
NTLM Relay Attacks: Types, Exploits and Security Best Practices
The best-known attack on NTLM authentication is undoubtedly the NTLM relay attack.
A relay attack is the act of intercepting information passing over a network and relaying it to a target, which is none other than the legitimate recipient of the information.
The NTLM protocol carries out the challenge/response in clear text because the password hash is designed to protect this secret. It is therefore possible for a malicious user in a Man In The Middle position to intercept all the challenges/responses circulating on the network.
As explained in the first part of this article, the response (NET-NTLM hash) to the NTLM challenge is sufficient to authenticate a user on the target server.
So if an attacker intercepts a valid response and relays it to the target, he finds himself authenticated instead of the legitimate client.
To do this, the attacker must carry out the following steps:
- Put himself in the Man in the Middle position.
- Initiate a connection request to the target server as the victim user.
- Relay the challenge to the victim user.
- Relay the victim user’s response to the target server.
- Perform any actions desired in the session opened by the server.
Now that we have seen the various theoretical elements of this attack, let’s look at a concrete example from an internal penetration test to highlight the possible impacts and exploits.
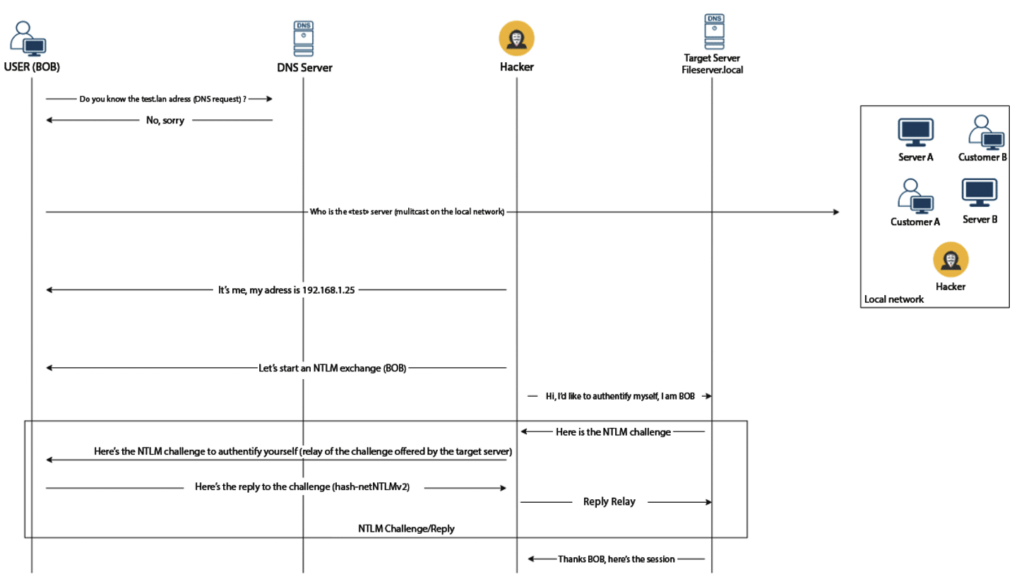
There are a multitude of techniques for positioning oneself in MitM: ARP poisoning, DNS spoofing, misconfiguration of the Windows IPv6 stack, and so on. Here, we are going to poison an NTBS (NetBIOS) and/or LLMNR request.
NTBS and LLMNR Poisoning
How do NTBS and LLMNR work?
These two protocols have been implemented by Windows. LLMNR is the successor to NetBIOS, but for reasons of backward compatibility, both have been enabled by default since Windows Vista.
Their purpose is to supplement the DNS protocol when it fails to resolve an address. The big difference is that their queries are not sent to a specific server (DNS server) but are broadcast over the subnet. This enables automatic discovery but also allows any machine on the subnet to respond to these requests.
Therefore, when using the Windows operating system, names are resolved in the following order:
- DNS query (sent to the server configured in the network settings)
- NTBS/LLMNR request (broadcast on the network)
The name resolution process is triggered as soon as you search for something on the network via the address bar of a browser (the use of LLMNR/Netbios is activated by default in Chrome), by using a network shortcut or via the Windows search bar (with the prefix \\).
In addition, if you have network shortcuts that are not resolved by DNS, Windows will perform an LLMNR/Netbios query every day (default DNS cache time).
Finally, all “.Scf”, “.url”, “.lnk” files pointing to an image (png, ico, jpg) accessible on a network share not resolved by DNS will automatically trigger an LLMNR/Netbios request as soon as the user accesses the folder containing these files. Windows will try to retrieve a thumbnail of the image and display it in the file explorer.
NTLM challenge recovery using LLMNR Poisoning
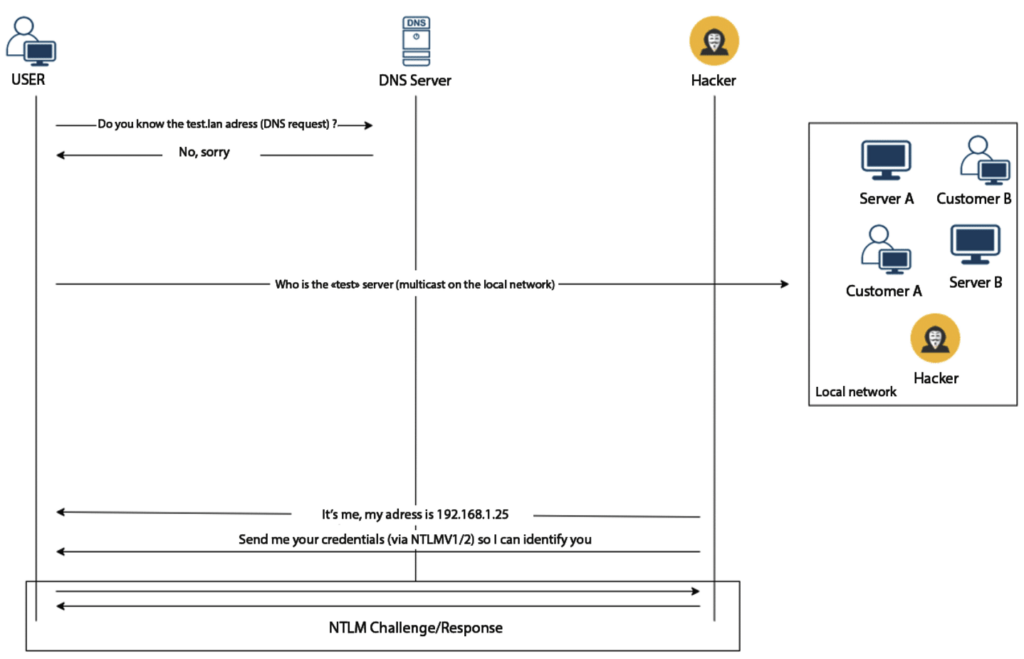
So let’s say a user is looking for the “test” server. The operating system makes the following requests on the network:

As you can see, we have the DNS request and then the LLMNR request which is made on a multicast address.
As a result, any machine on the subnet can respond to this request and give its IP address for the requested name.
This attack can be carried out using Responder.
Responder is a tool whose main function is to allow multicast protocols such as MDNS, NTBS or LLMNR to be poisoned. It can also emulate several types of service such as SMB, HTTP, LDAP or RDP.
An attack using Responder can be described as follows:
In practice:
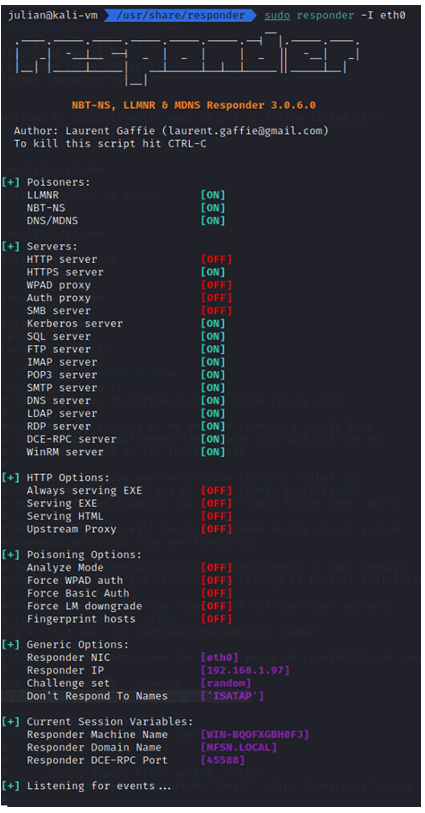
Running Responder on the attacker’s machine:
sudo responder -I eth0On his side, the user enters “\\test” in a search bar (Start menu, Windows Explorer or Chrome):
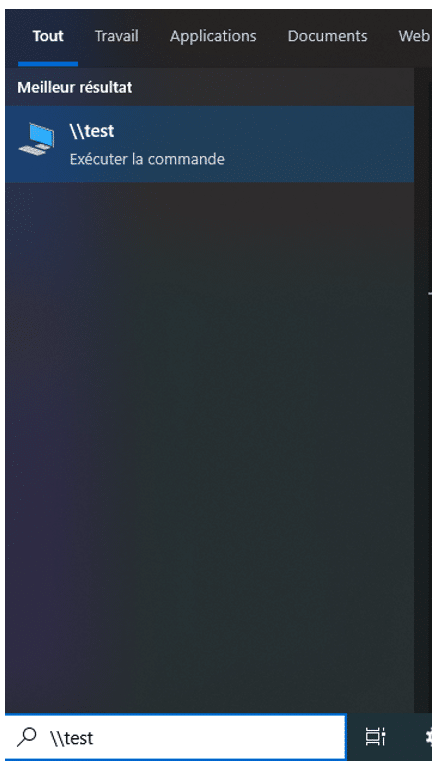
Windows then performs a name search for each new letter entered in the search bar. As the DNS server does not know this domain, an LLMNR request is sent and broadcast on the network.
Our Responder program responds to this request with an authentication request for the domain name “te”.
This initiates an NTLM challenge with the victim in order to recover its NTLMv2-SSP hash.
Once the operation is complete, the Responder program displays the hash in the console:
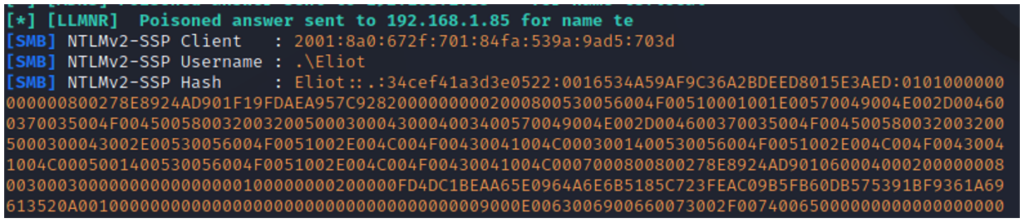
We have just carried out an LLMNR poisoning attack which enabled us to recover the response to the NTLM challenge (hash NTLMV2-SSp or Net-NTLMV2).
This response contains the NTLM hash of the legitimate user. This hash can be broken to recover the user’s password.
However, in an NTLM relay attack, what we are interested in is not recovering a password, but our victim’s active session.
The attack presented allows the response to the challenge proposed by the attacker’s machine to be retrieved. To abuse a session, we need to retrieve a challenge validated by a target server.
We therefore need to modify our attack.
In this case, the Responder program (still deployed on our machine) will be used only as an LLMNR poisoning tool and all incoming connection requests will be relayed to a target service (NTLM-compatible service).
A well-known protocol targeted by this type of attack is the SMB (samba) protocol. SMB is a file exchange protocol which natively supports NTLM authentication and which, by default (on SMBv1 and SMBv2) does not implement the signature, a protection against relay attacks.
NTLM relay on SMB services
To attack the network’s SMB services, we modify the configuration file of the Responder program so that it does not start its SMB server.
nano /etc/responder/Responder.confThis is done as follows:
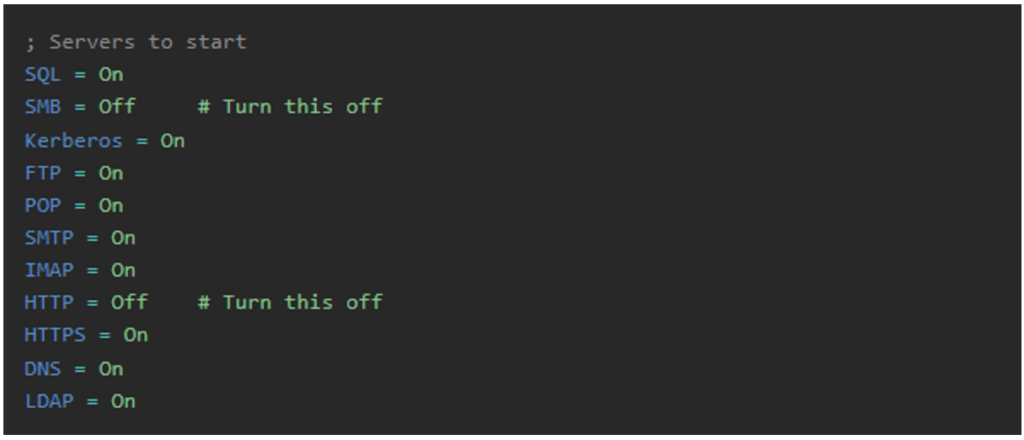
With Responder ready, we need to identify the SMB services that are vulnerable to relay attacks.
Identifying vulnerable SMB services
To do this, we’re going to use the “crackmapexec” utility, which makes it easy to interact with the SMB service on any machine.
Retrieve the list of targets vulnerable to SMB relay (the -gen-relay-list argument is used to target SMB services that do not implement the signature):
crackmapexec smb —gen-relay-list smb_targets.txt 192.168.1.0/24Once this list has been retrieved, we’ll use the “ntlmrelayx” tool to relay challenges/responses between vulnerable SMB services and victim clients.
In this way, Responder will poison LLMNR/NETBIOS requests issued by a victim client.
Then, instead of generating a challenge, ntlmrelayx will initiate authentication with the target services (IP in the “smb_target.txt” list). The challenge is relayed to the victim, and the response to the server.
Launching Ntlmrelayx against target services (smb_targets.txt):
ntlmrelayx.py -socks -smb2support -tf smb_targets.txtThe “socks” parameter is used to instruct the tool to store retrieved sessions in a proxy socks service on the attacker’s machine.
This will enable the attacker to reuse these sessions with other tools using the proxychains utility.
By default, Ntlmrelayx opens a socks service on port 1080 of the “localhost” interface. So, we need to modify the proxychains configuration so that it interacts with this port.
sudo nano /etc/proxychains4.confTo do this, we apply the following configuration:
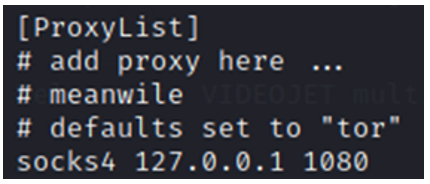
With this configuration, all our tools are now ready. We can now execute our attack:
As with the previous attack, following a user’s blunder (searching for a non-existent network location or a chrome search), a network link that is no longer resolved by the internal DNS or, if the audit allows, a link sent because of a phishing campaign; an LLMNR or NBT-NS request is sent to the network. Our Responder tool will proceed to poison it.

Now that the victim is communicating with us and is believing to authenticate to a server, ntlmrelayx takes over and sends an authentication request as the victim (user of machine 192.168.1.162).
The challenge proposed by the server is relayed to the victim and its response to the server. If the response is validated by the target server, the open session is stored in the socks service opened by Ntlmrelayx.
After a successful attack, the socks service contains the following sessions:

Now that we have these sessions, we can use them to interact with the SMB services on machines 192.168.1.161 and 192.168.1.205.
Exploitation
For teaching purposes, we will develop our reasoning based on the example presented above.
In other words, we assume that the attacker succeeds in obtaining the access described in the screenshot, i.e. two valid sessions of the TEST/TESTADMIN user.
In our example, this user is a domain administrator, but neither of the two machines is Active Directory. Starting from this initial situation, we’re going to unfold the set of actions that an attacker could perform and see how we can compromise the entire domain from this ephemeral session.
Initially, whatever the privilege level, we will take advantage of the access gained to inspect the contents of the file shares. This is the only action available at this stage, since the session obtained on server 192.168.1.205 does not have administrator privileges.
If one of the obtained sessions does have administrator privileges, it will be possible to compromise the target machine. In fact, access to an SMB service opens up a lot more possibilities than simple file transfer. This protocol can also be used to execute commands on the remote machine. To do this, we can use SMBexec or PSexec.
SMBexec works as follows:
- Creation of a Windows service (named BTOBTO). SMB can use named pipes, enabling it to interact with the Windows RPC API (MSRPC). SMBExec takes advantage of this feature to communicate with the “Service Control Manager” RPC server (via the “\PIPE\svcctl” named pipe) in order to create, start and stop a service.
- The name of this service contains the command to be executed for reference “cmd.exe” using an environment variable (%COMSPEC%) which contains the command to be executed and redirects the command output to a temporary file.
- Run of this service, which executes the file C:\windows\temp\execute.bat.
- Retrieves the output file C:\__output
- Deletes the file C:\__output
- Displays the contents in the attacker’s console.
The minimum requirement is writing access to one of the disks on the SMB share (by default, you need a writing access to C$). In addition, it’s important to note that SMBexec is less likely to be detected by antivirus or EDR software than PSexec, as it doesn’t transfer or execute a binary program on the remote machine, only a service and a text file are created.
Executing SMBexec (with the session stored in the proxy socks via “proxychains”):

Now that we have a command execution as administrator on the machine (the relayed account having local administration rights). It is possible to create a new local administrator account on the victim machine. This will enable us to log on permanently and no longer rely on our ephemeral session. Note that it is not possible to create an account directly linked to the domain, as this action can only be performed on the Active Directory.


With this action, we’ve switched from a NET-NTLM hash to a local administrator account.
Once this user has been created, we can extract the memory of the LSASS process (the process which contains all NT hashes of connected users) on the machine.
NB: it is perfectly possible not to create this user and to use secretdump directly with proxychains. However, creating this user will enable a legitimate connection to the machine in question.
As a result, it will be possible to log in with the created account and disable the antivirus. This will facilitate hash recovery (via mimikatz, secretdump or crackmapexec).
With crackmapexec, this gives the following commands:
With the local admin account:
#~ cme smb 192.168.1.161 -u testvaadata -p te5tV00daat7Admin -M lsassy --local-authWith the TEST/TESTADMIN account (more easily detected by the antivirus):
#~ proxychains4 cme smb 192.168.1.161 -u TESTADMIN -d test -M lsassy The hash thus recovered enables us to authenticate ourselves to the Active Directory via the “Pass The Hash” method implemented by several tools, including crackmapexec.
As we have seen, the NT hash is the only condition for validating an NTLM challenge. We can therefore validate challenges from all servers to which the user has access. We can even say that having a user’s NT hash is equivalent to having his password in clear text.
The limits of NTLM relay attacks
One of the challenges of the NTLM relay attack is to get into a “Man In The Middle” position.
Indeed, during a network penetration test, it is likely that the example presented above will fail because the network’s automatic discovery protocols are disabled.
However, as mentioned above, there are other methods that allow the attacker to be in a MiTM position.
- The automatic proxy detection (WAPD) enabled on user machines can also be poisoned by Responder.
- If IPv6 is not disabled on user machines, it is possible to abuse requests (DHCPv6) to set up a corrupt DNS (our machine) as a name resolution server to resolve IPv6 names to get into a MiTM position.
- ARP Spoofing is also a simple way of getting into MiTM. The only limitation is that the attacker will only poison the machines in his sub-network (limitation of the ARP protocol).
Overall, all the classic spoofing methods that can put an attacker in MitM can be used to start a relay attack.
If, despite all these techniques, the attacker does not succeed in getting into a “Man In The Middle” situation, he can still force re-authentication on a target machine. This is known as “coerced attacks”.
These include the exploitation of the PrintNighmare vulnerability identified in 2021. This vulnerability allows any user in the domain to interact with the MS-RPRN RPC service via SMB through the “named pipe” “\pipe\spoolss”. In this way, the attacker can re-authenticate the service on the machine of his choice and perform a relay.
Despite Microsoft’s efforts to limit the exploitation of PrintNightmare, coerced attacks have developed on other services such as MS-FSRVP, MS-DFSNM and MS-EFSR. Given the persistent use of this technique, Microsoft decided that the problem has nothing to do with these services, but with the lack of relay protection.
How to prevent NTLM Relay Attacks?
To prevent NTLM relay attacks, it is possible to counter each of the methods used to obtain a NET-NTLM hash:
- Disable LLMNR/NETBIOS protocol(s),
- Disable all Microsoft services vulnerable to coerced attacks,
- Set up a static ARP table, etc.
However, we do not recommend implementing these methods, as they are very difficult to set up.
The most effective way of countering the relay is to implement these actions on the servers.
- Disable NTLM authentication on your network and delegate it solely to Kerberos if possible.
- Enable signing on SMB and LDAP.
- The HTTPS protocol does not support signing. You can therefore disable the NTLM protocol for HTTPS services specifically, or you can use EPA (Extended Protection Authentication) protection. In short, this protection adds signature to protocols that do not implement it.
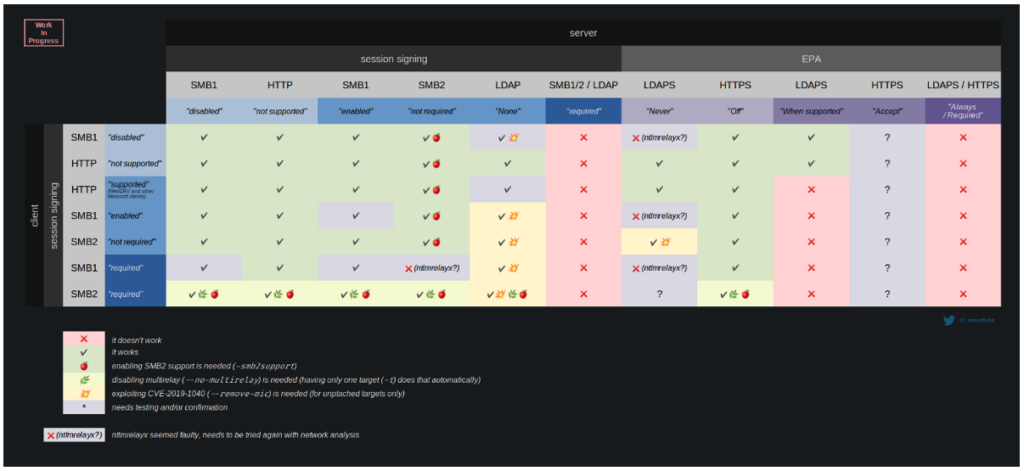
The table below summarizes the exploitability of the NTLM relay attack according to the protocols and protection enabled (source: www.thehacker.recipe).
Sources:
SMB exec
Smb rpc service: https://blog.openthreatresearch.com/ntobjectmanager_rpc_smb_scm
SMEXEC explication : https://u0041.co/blog/post/2
Code: https://github.com/fortra/impacket/blob/master/examples/smbexec.py
NTLM authentication
https://beta.hackndo.com/ntlm-relay
https://learn.microsoft.com/en-us/windows/win32/secauthn/microsoft-ntlm
https://learn.microsoft.com/en-us/openspecs/windows_protocols/ms-nlmp/5e550938-91d4-459f-b67d-75d70009e3f3
Named pipe: https://learn.microsoft.com/en-us/windows/win32/ipc/named-pipes
Counter measures and coerced attacks: https://www.thehacker.recipes/ad/movement/ntlm/relay
Author: Eliot RABAUD – Pentester @Vaadata